

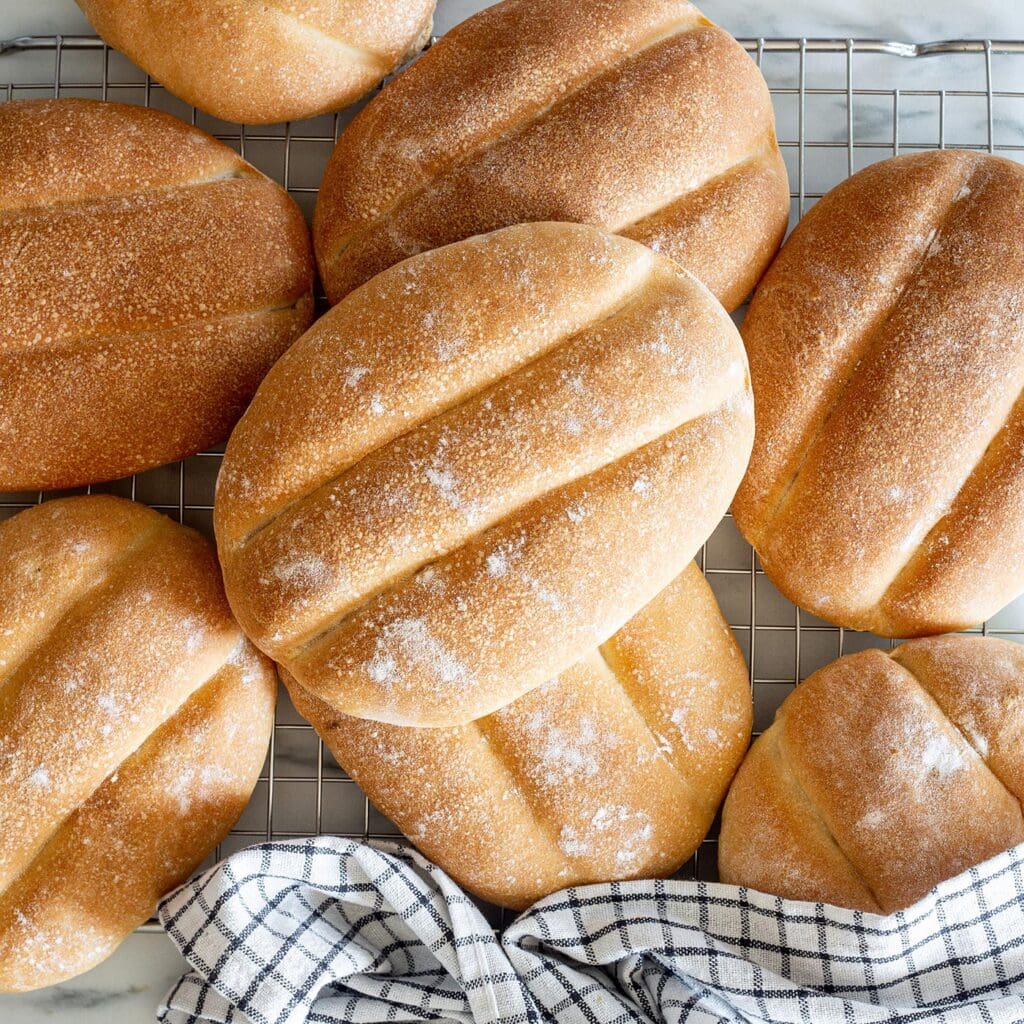
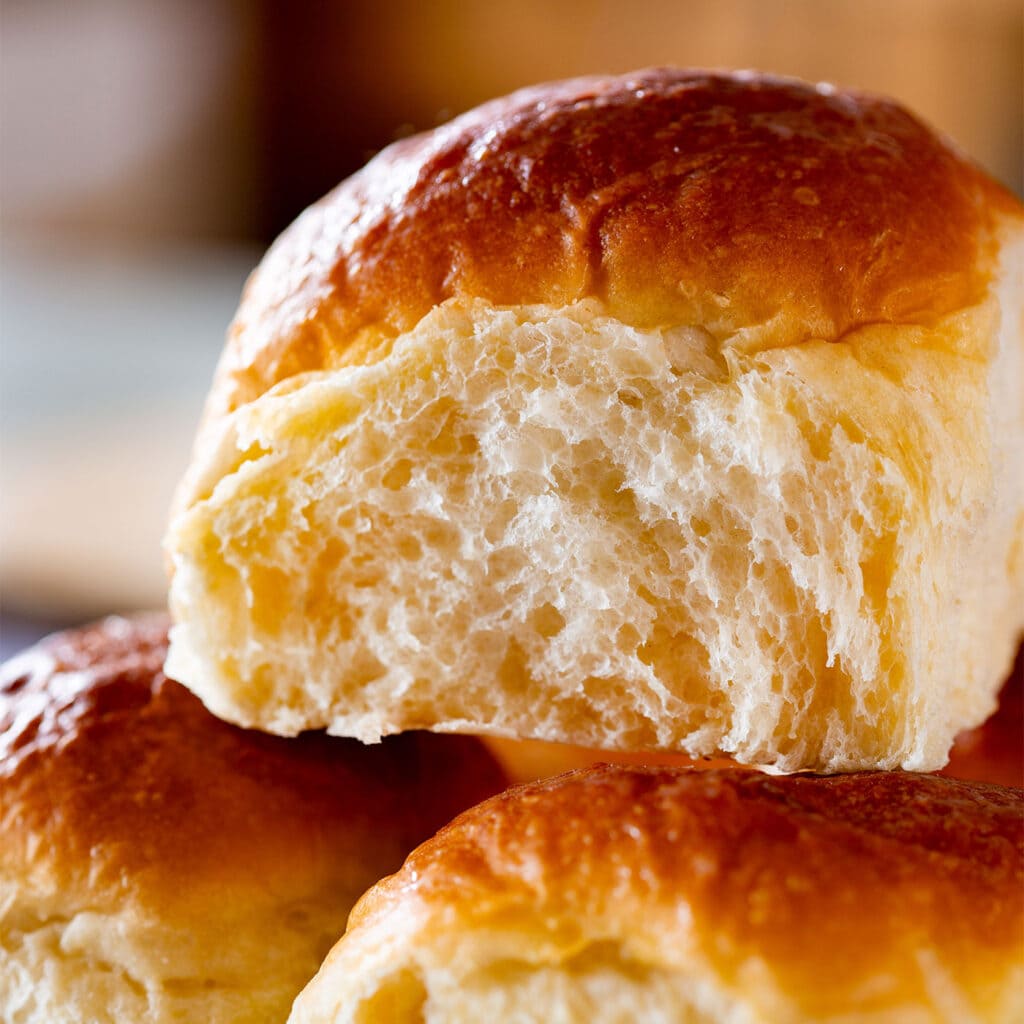
Bolillo bread is Mexico’s go-to crusty rolls! Light, airy inside with a beautifully golden, crispy crust. They have an oval shape with slightly pointed ends, giving them that signature look you’ll recognize from every bakery and market stall across the country.

Making bolillo bread at home might seem intimidating, but this recipe is surprisingly easy! With just a few simple ingredients you can recreate the same panadería-style crust and soft, fluffy interior in your own kitchen.
The secret? A good knead, proper resting time, and steam in the oven to achieve that classic crispiness.
If you’ve ever wanted to bake authentic Mexican rolls at home, this bolillo recipe is perfect for beginners. No fancy equipment needed—just your hands, an oven, and a little patience.

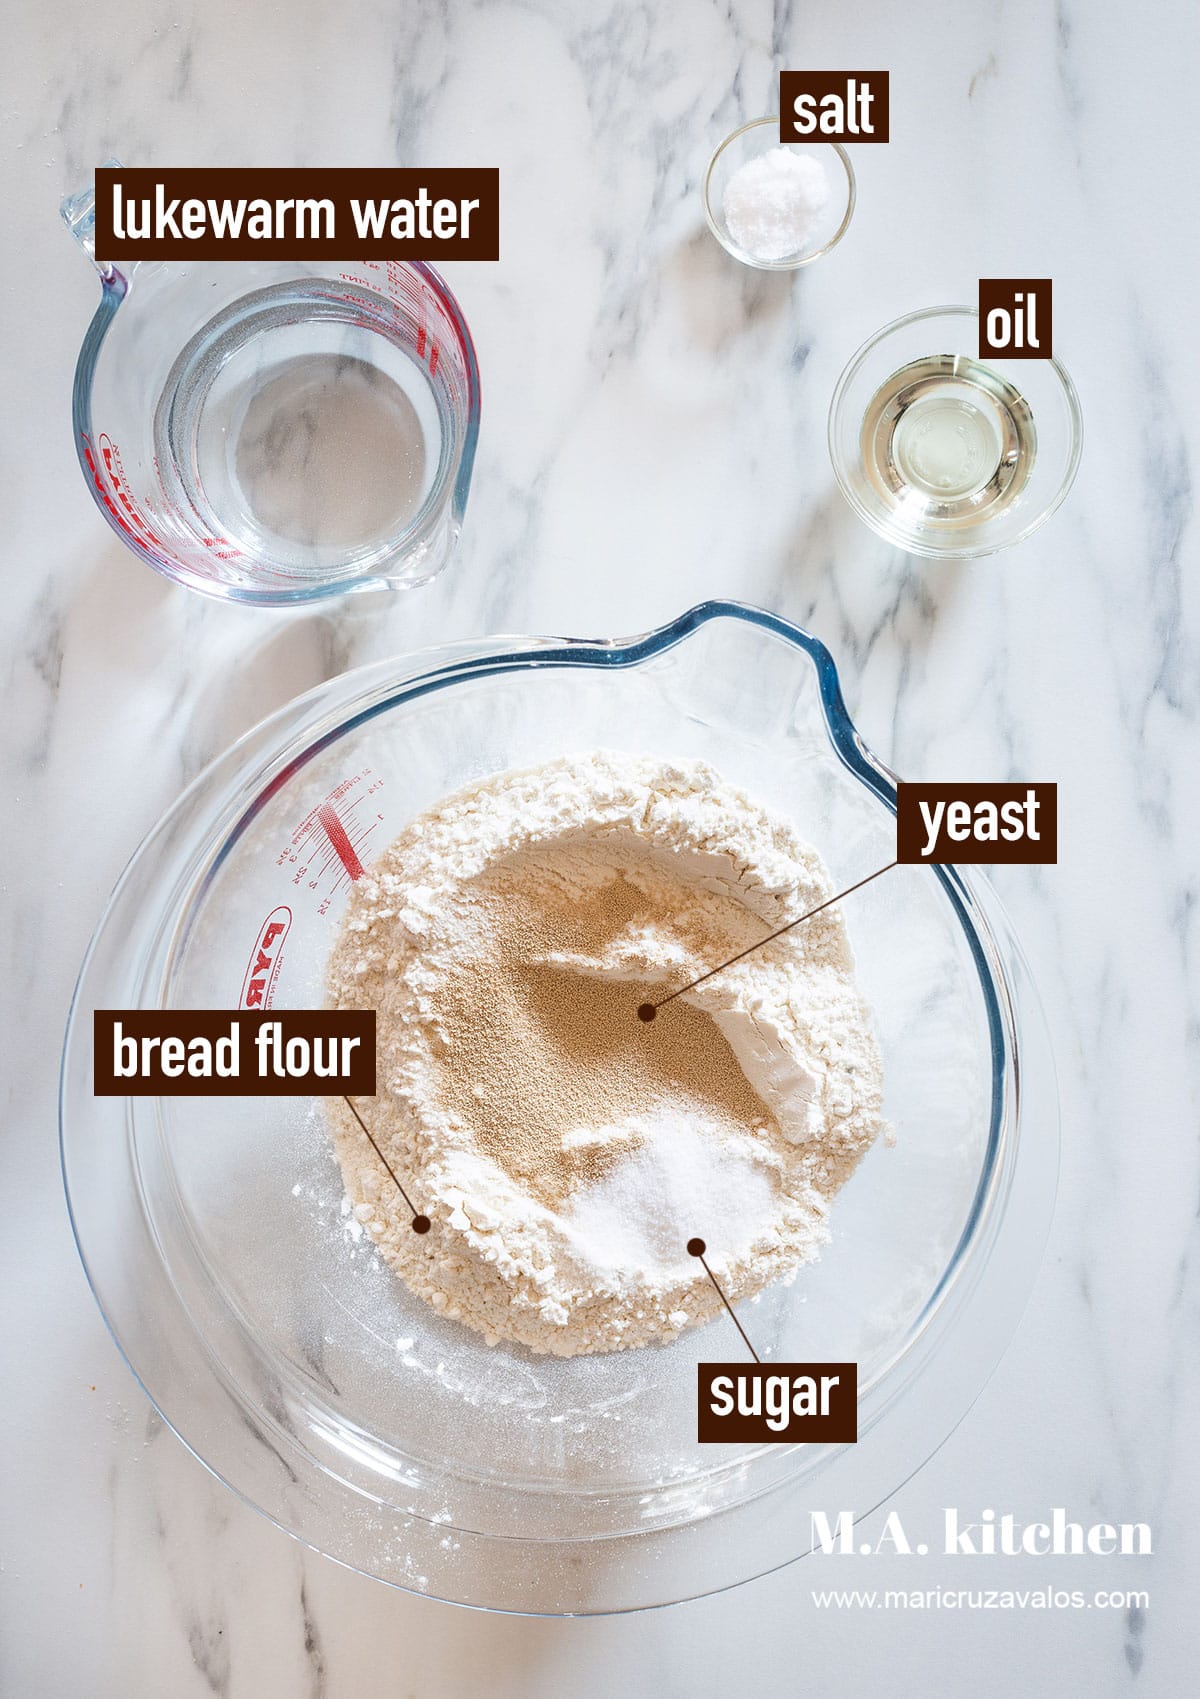
Ingredients
- Flour: Use strong bread flour with at least 11% protein. This gives your bolillos that perfect chewy texture and crispy crust.
- Yeast: One packet of active dry yeast (7g) is just about 2 ¼ teaspoons—easy to measure!
- Salt & Sugar: Salt adds flavor, while sugar helps the yeast do its magic, giving the dough a nice boost.
- Oil: Traditional bolillo bread is made with pork lard (melted), but any vegetable oil like olive, canola, or corn works just fine.
- Water: Lukewarm water is best, meaning it should feel warm but not hot to the touch. This helps the yeast activate properly.
How To Make Bolillo Bread Step By Step
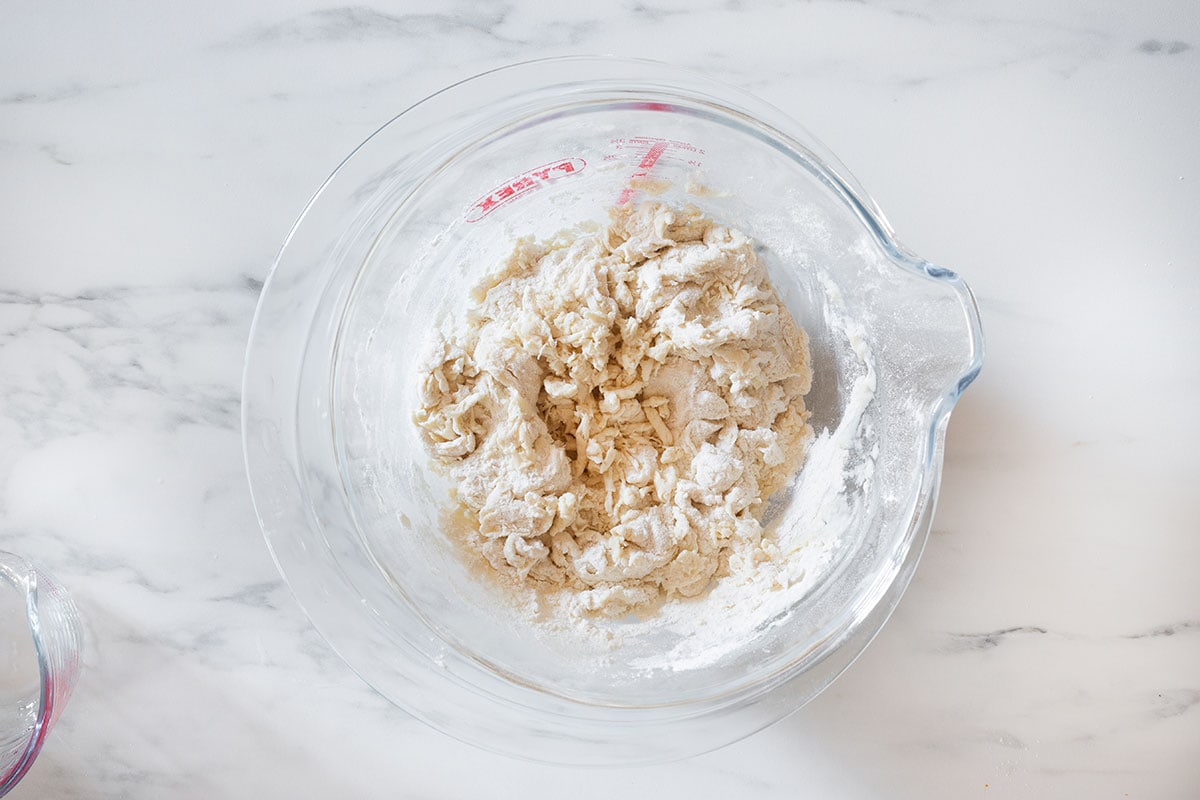
In a medium-sized bowl, combine the flour, yeast, and sugar. Give it a good stir to distribute everything evenly. Now, dissolve the salt in warm water (this helps it incorporate better), then pour it into the flour mixture along with the oil.
Use a fork to mix until the dough starts coming together. It’ll look a little shaggy at first, but that’s exactly what you want.
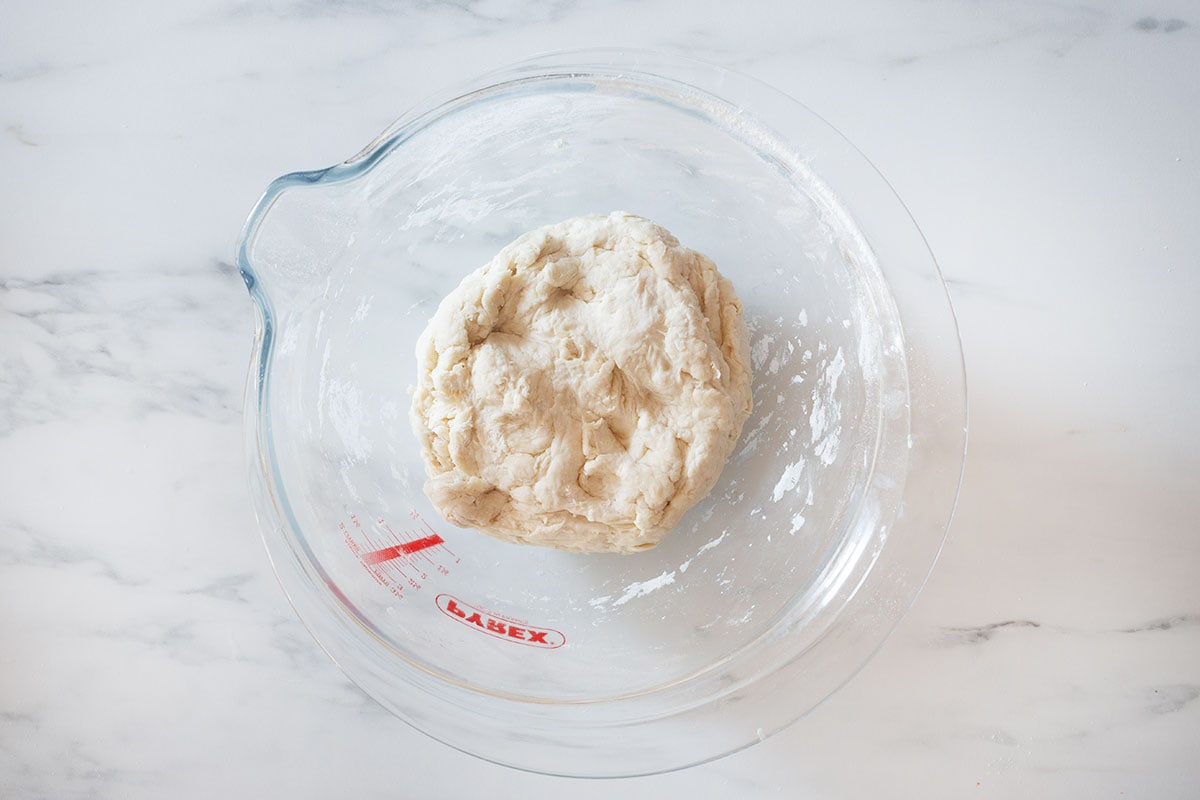
Turn the dough onto a lightly floured surface and knead for about a minute, just until all the ingredients are well combined. No need to overwork it at this stage!
Cover the dough with a kitchen towel and let it rest for 15 minutes—this gives the flour time to absorb the moisture, making the final kneading easier.
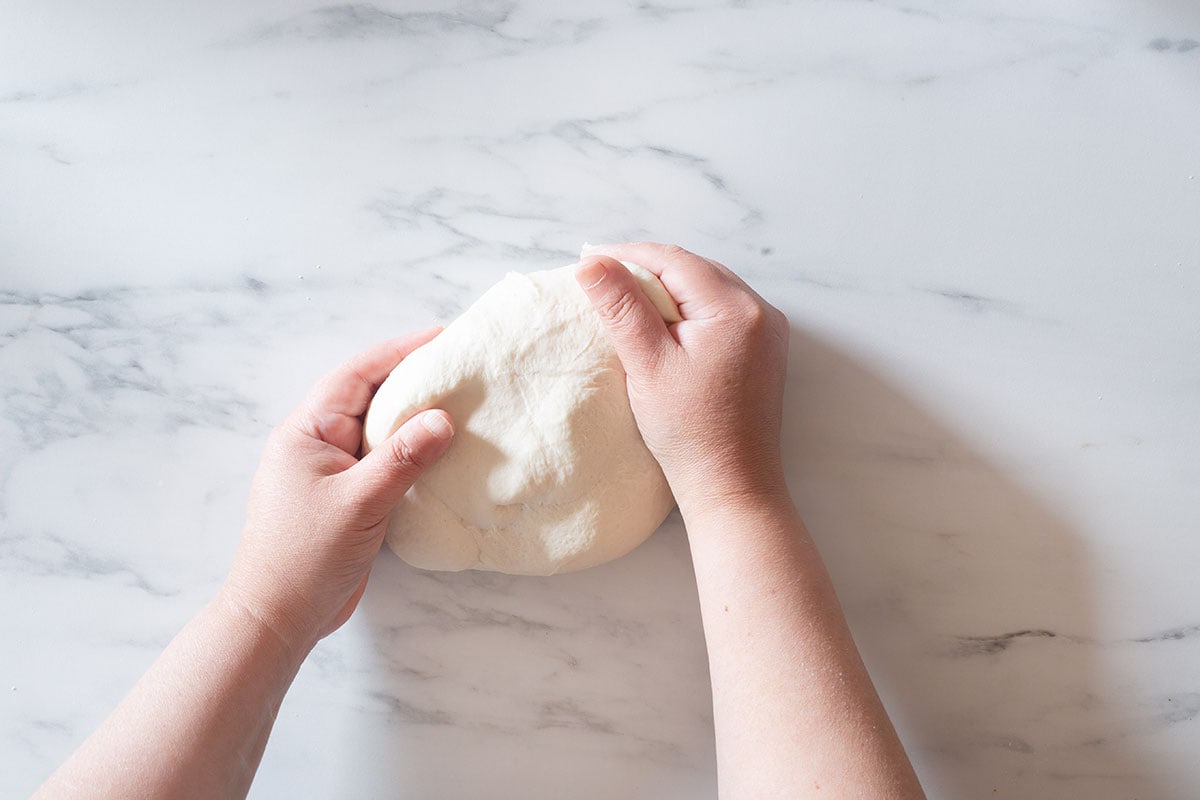
After 15 minutes, knead the dough for about 5 minutes until it turns smooth and elastic.
You’ll feel it becoming more soft under your hands, which is a good sign.
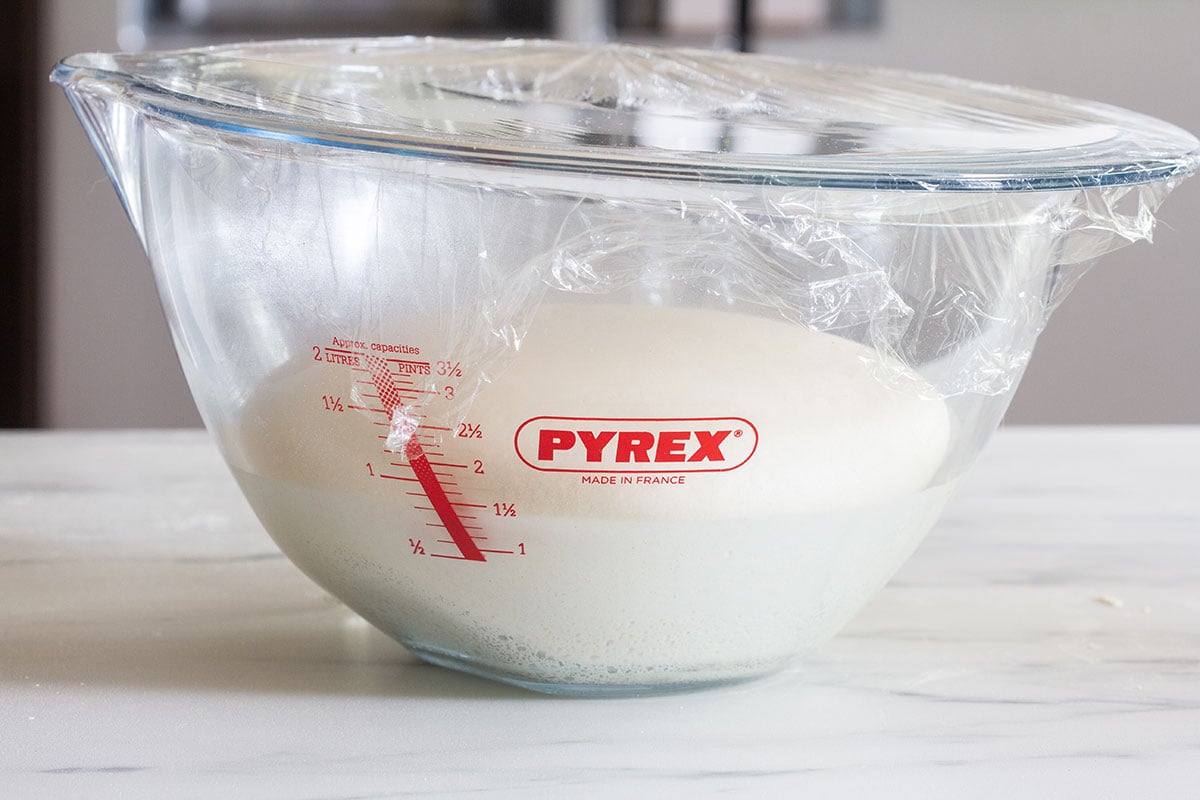
Shape it into a ball, lightly oil a large bowl, and place the dough inside. Cover it with cling film and let it rise in a warm, draft-free spot until it doubles in size, about 1 hour and 30 minutes.
If your kitchen is on the cooler side, give it a little extra time—yeast likes a cozy environment!
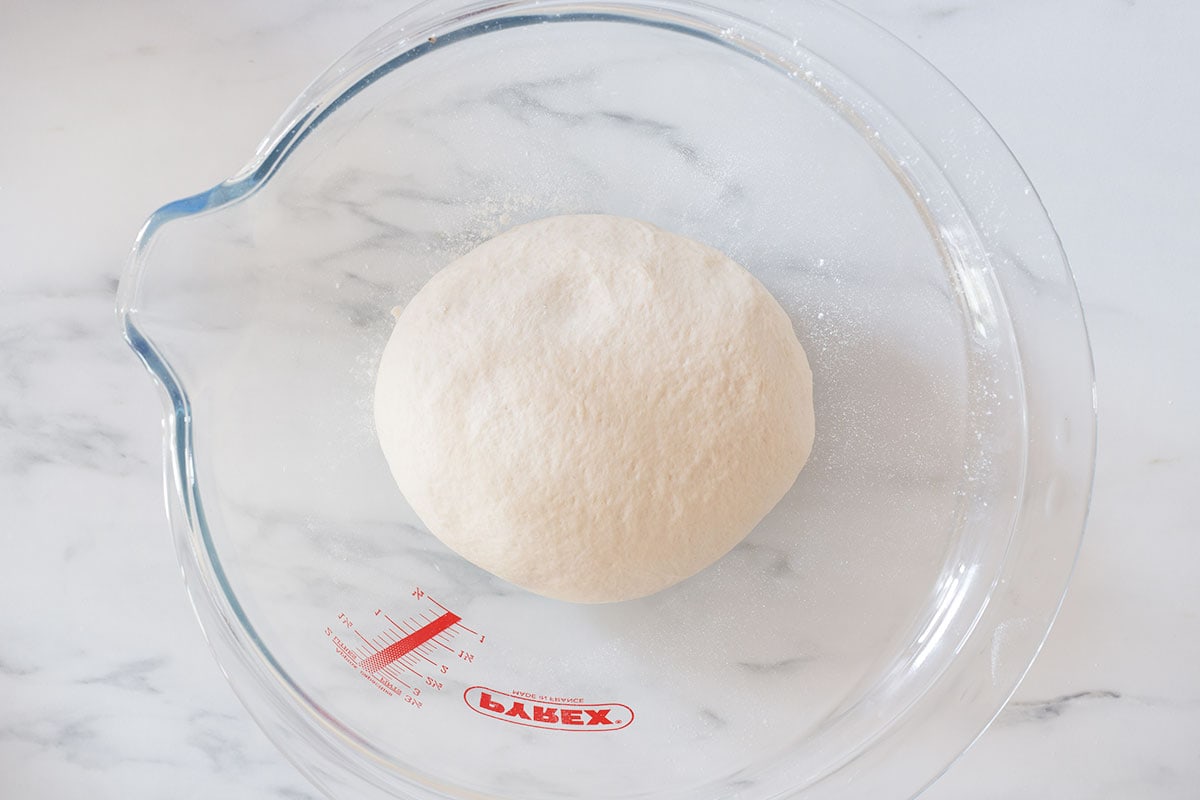
Once the dough has risen beautifully, transfer it back to a lightly floured surface and gently punch it down to release any trapped air.
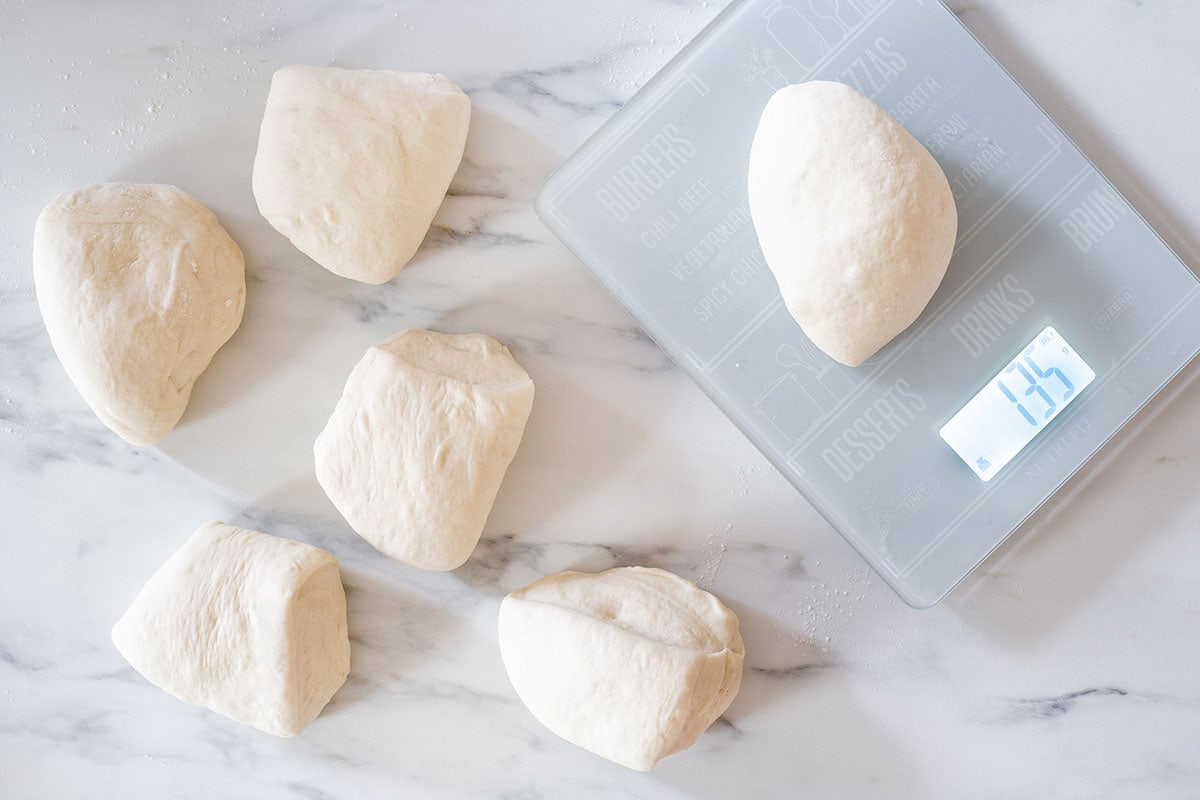
Knead it briefly, just enough to bring it back together, then divide it into 6 equal portions.
You can use a kitchen scale if you want all the bolillo rolls to be the same size. Mine weighed about 4.75 oz (135g) each. Otherwise, just eyeball it!
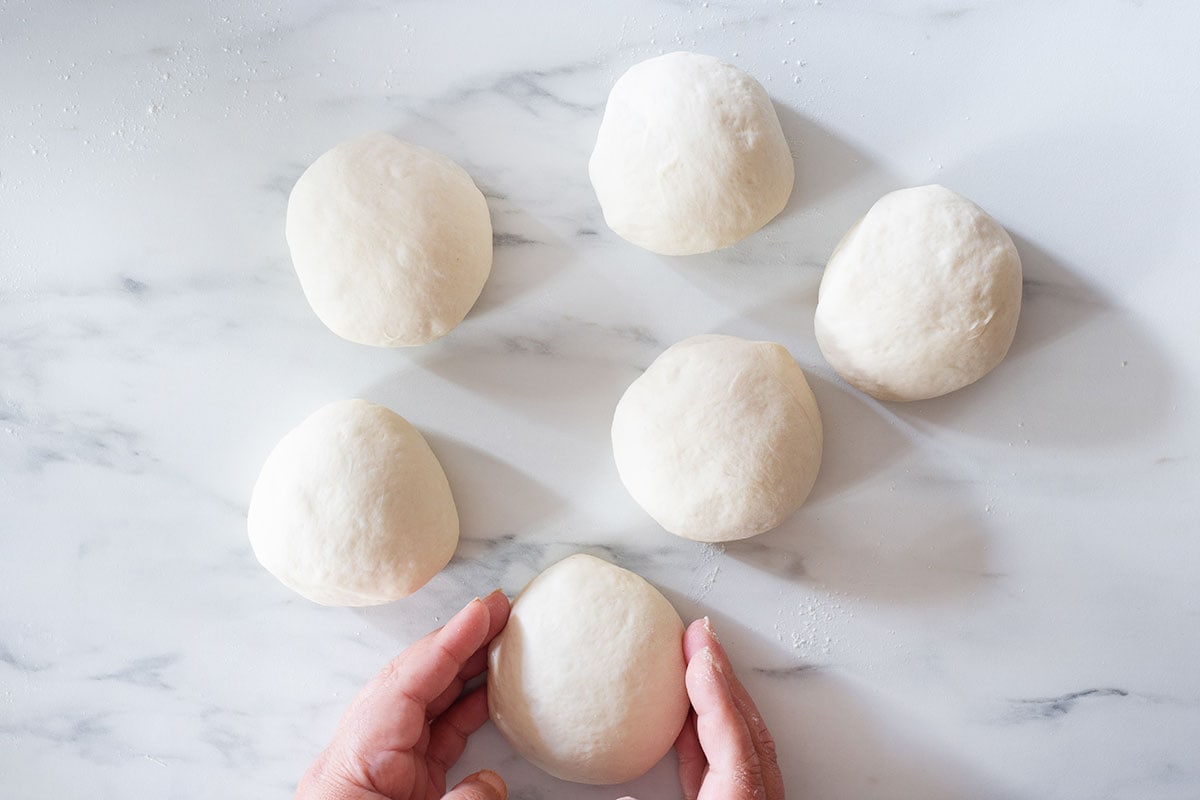
Roll each piece into a ball and cover them with plastic wrap, letting them rest for 10 minutes.
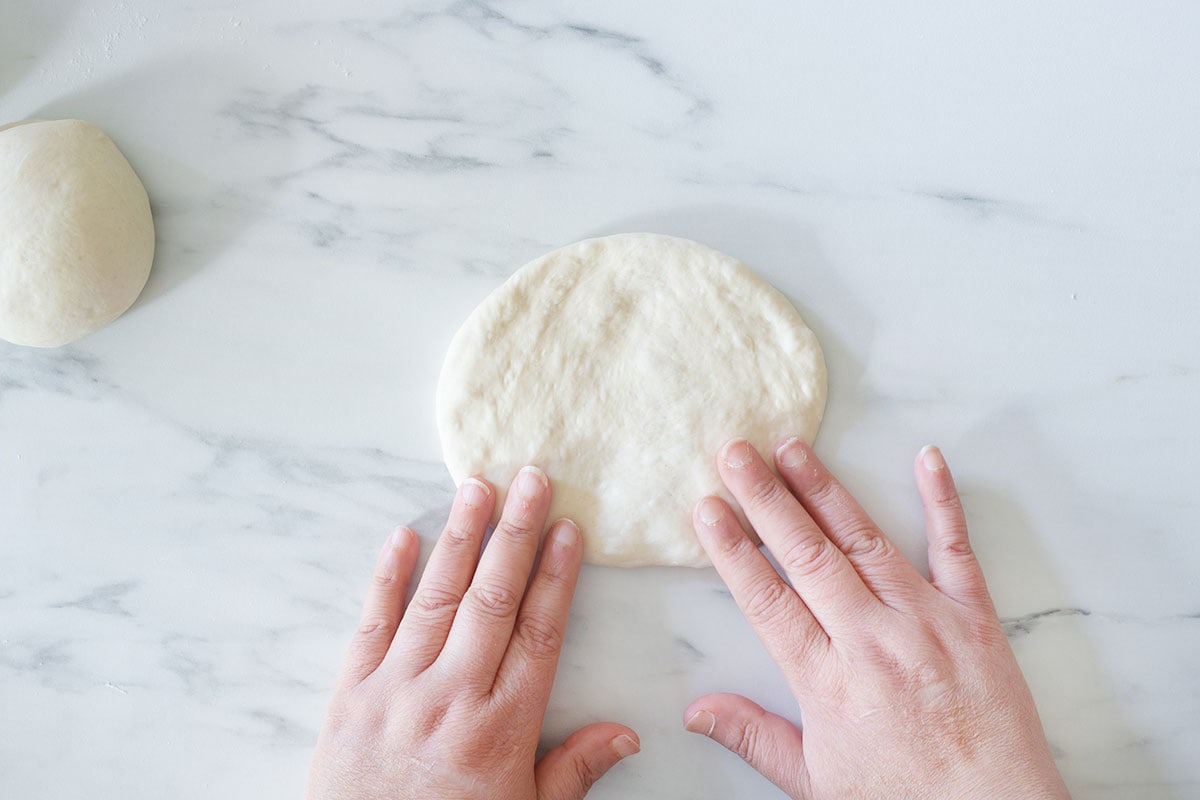
Now, take one dough ball and place it on a lightly floured surface. Gently flatten it with your fingers and the palm of your hand, shaping it into a rough oval.
It doesn’t have to be perfect, just aim for an even thickness so it bakes uniformly.
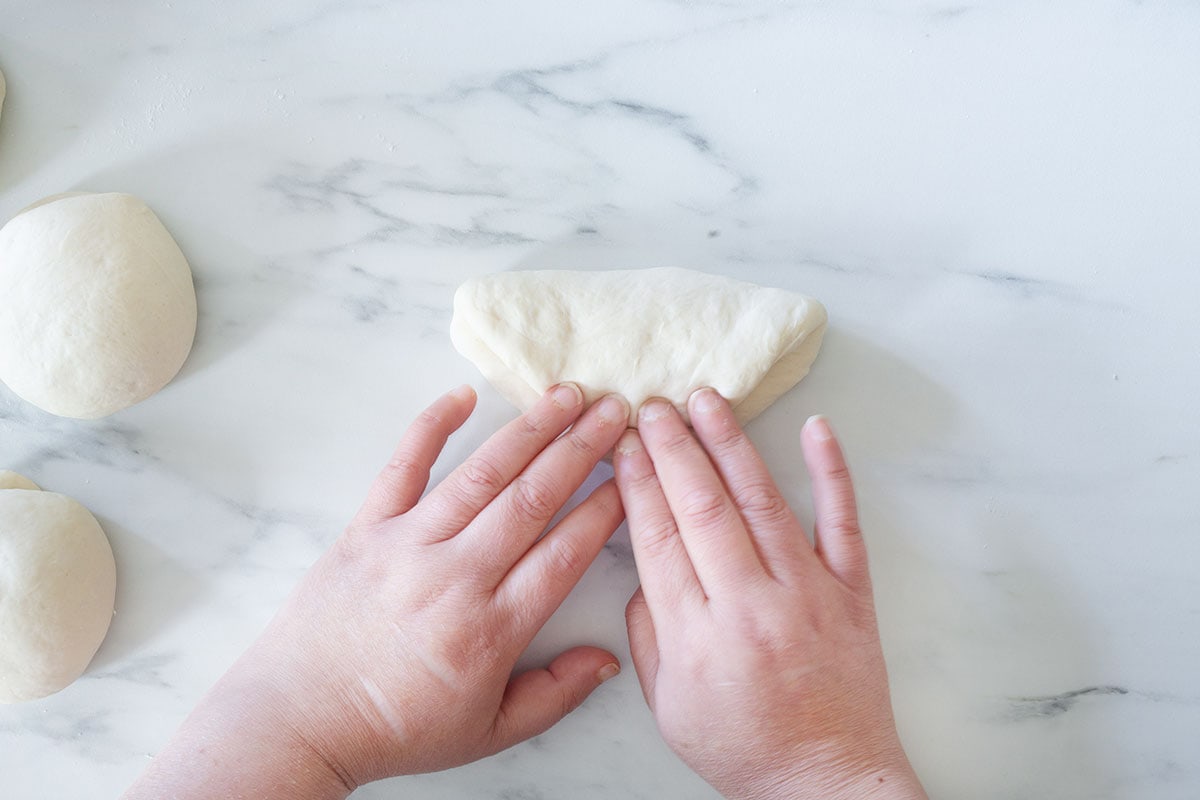
Next, fold the dough in half lengthwise, like a taco, pressing the edges together lightly with your fingertips to seal it.
This step helps create structure and gives the bread its signature airy texture inside.
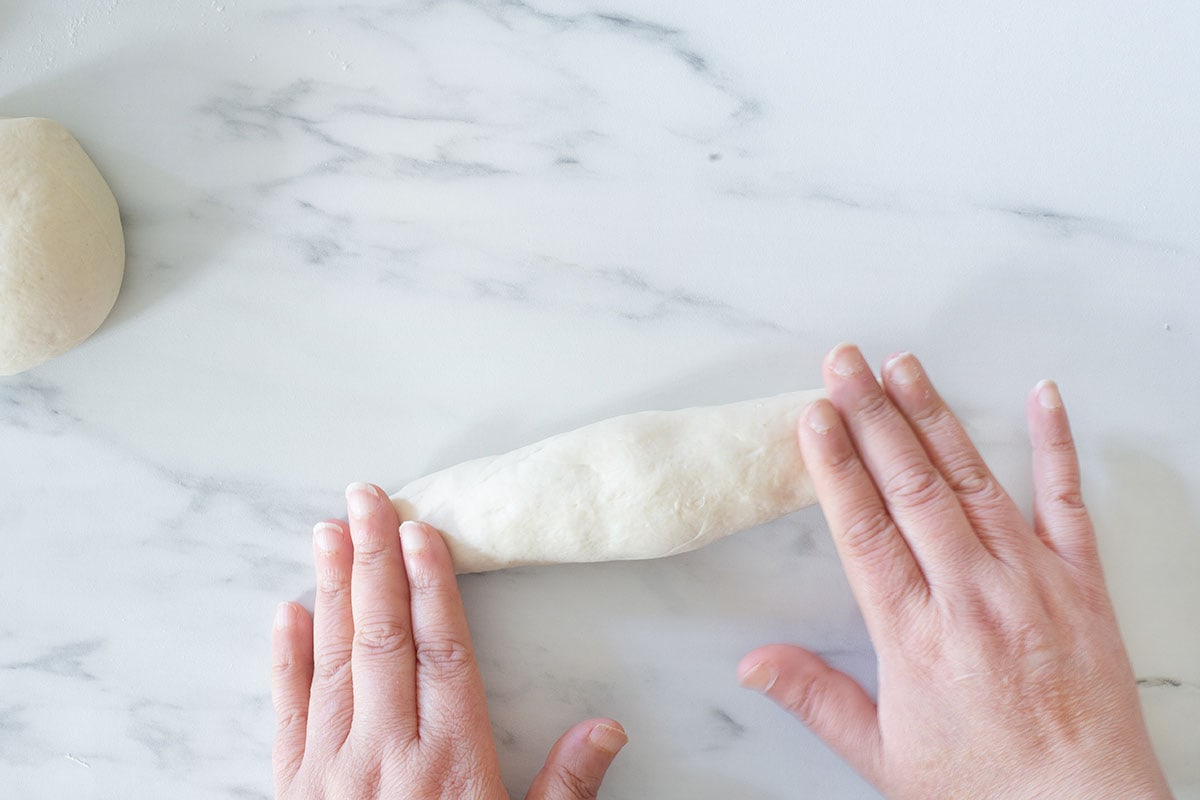
Now, to shape the ends: place both hands on the dough and begin rolling it back and forth, applying gentle pressure toward the outer edges.
The goal is to taper the ends slightly while keeping the center a bit fuller—this is what gives the bolillo bread its signature pointed shape.
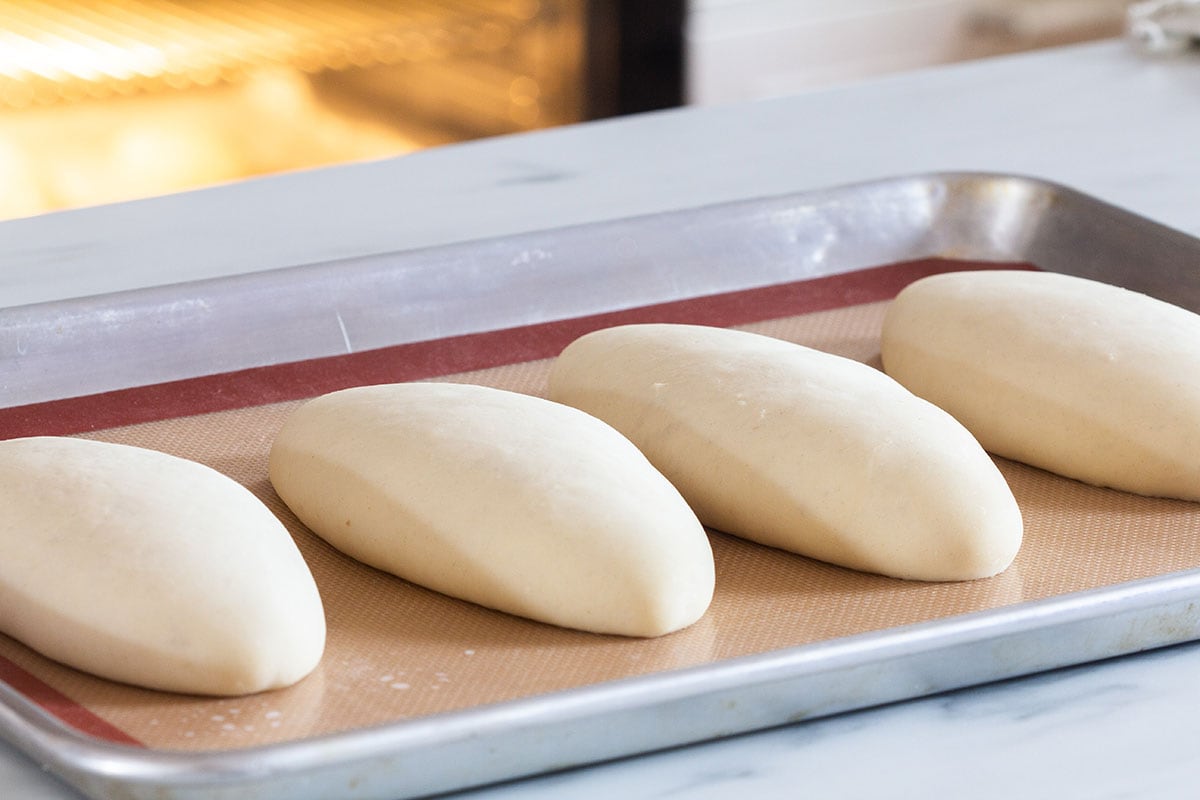
Once shaped, transfer each roll to a parchment-lined baking sheet, leaving about an inch of space between them to allow for expansion.
Repeat the process with the remaining dough balls.

Loosely cover the shaped rolls with cling film and let them rest for another hour, until they puff up beautifully. While they’re rising, preheat your oven to 450°F (230°C).
To get that classic crispy crust, place an oven-safe dish filled with about 4 cups of water on the lower rack. This creates steam, which helps the bread develop its golden, crackly texture.
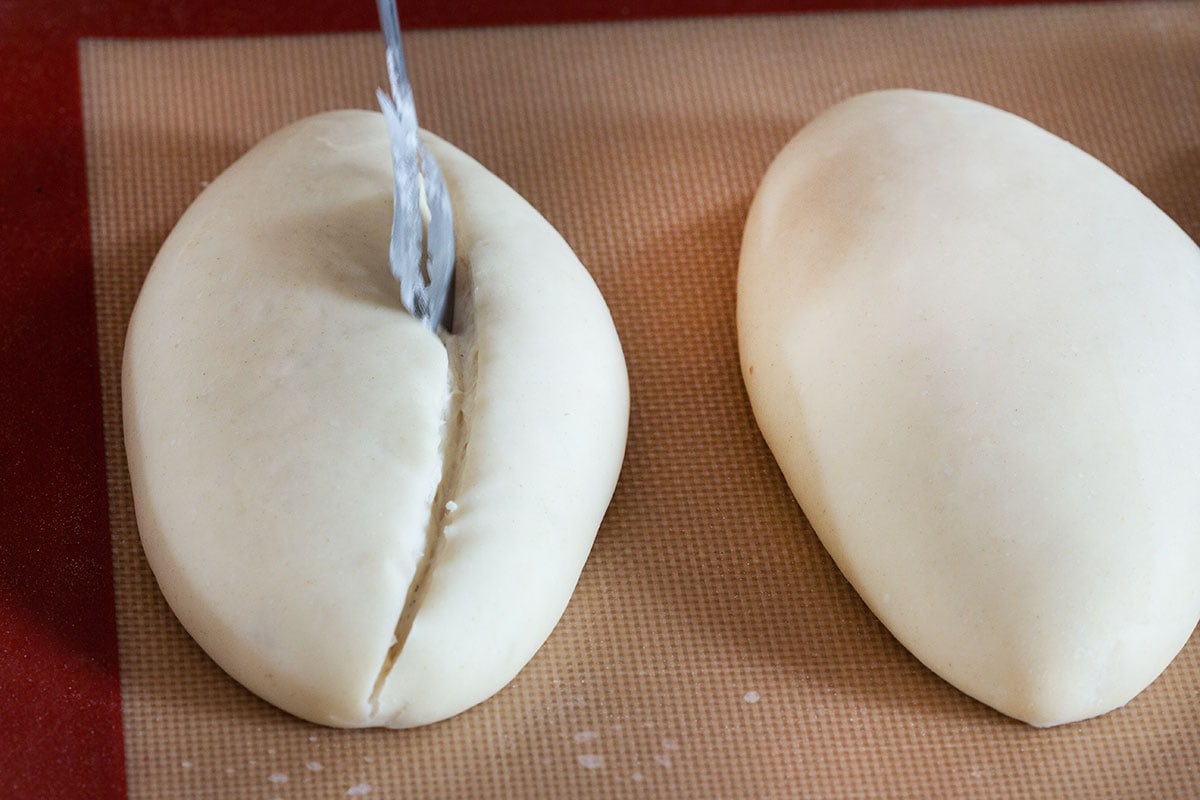
Right before baking, take a very sharp knife (or a lame, if you have one) and make a single lengthwise slash on the top of each roll.
This allows the bread to expand properly in the oven.
Lightly spray the rolls with water. This step is key to achieving that beautiful shine and crispy crust!
Bake for about 20 minutes, or until bolillos are golden brown and sound hollow when tapped on the bottom.
Once baked, transfer them to a wire rack and let them cool slightly before enjoying.

The kitchen will smell absolutely amazing at this point, and trust me, resisting the urge to tear one open right away will be the hardest part!
This bolillo bread is perfect for making tortas, like my torta de carnitas or a juicy asada torta.
However you eat them, they’ll bring a warm, comforting taste of Mexico to your table.
Keeping Them Fresh & Reheating
If you’re not eating all your bolillo bread the same day, let the rolls cool completely before storing them in an airtight plastic container or bag to keep them soft.
They’ll lose their crunch, but no worries, you can bring them back to life!
Just spray them lightly with water and pop them in a 350°F (175°C) oven for about 5 minutes. Or, for a quick fix, toast them on a comal or cast-iron skillet over medium heat until crisp again.

More Mexican Bread Recipes


Loved this bolillo bread recipe? Leave a comment below and let me know how it turned out! You can also subscribe to my newsletter and follow this blog on Pinterest.

Homemade Bolillo Bread
Ingredients
- 3 ½ cups bread flour (about 500g)
- 2 teaspoon active dry yeast
- 2 Tablespoons vegetable oil
- 1 ¼ cups lukewarm water (about 300 ml)
- 1 ½ teaspoon salt
- 1 teaspoon sugar
Extras
- flour for the surface
- oil for bowl
Instructions
- Place the flour, yeast and sugar on a medium-size bowl. Mix to combine.
- Dissolve salt in the water, add to the flour and then add also the oil. Use a fork to combine the ingredients.
- Knead the dough just enough to combine well all ingredients and achieve a lumpy and rough dough (about 1 minute).
- Cover and leave the dough to rest for 15 minutes.
- Transfer the dough to a slightly floured surface and knead for 5 minutes or until you’ll achieve a smooth dough.
- Make a ball, slightly oil a large bowl and place the dough inside.
- Cover the bowl with cling film and place it in a warm place away from drafts.
- Allow the dough to rise until doubled in size (about 1 hour and 30 min).
- Remove the dough from the bowl, place it in a lightly floured surface and gently push your fist in to deflate it.
- Quickly knead it into a ball again and divide it into 6 equal pieces.
- Roll each piece into a ball, cover them with cling film and let them to rest for 10 minutes.
- Slightly flour a working surface. Take a piece of dough and flatten it with the palm of your hands and fingers, making some sort of pancake.
- Now, fold the pice into an half-moon, pressing the borders lightly with your fingers.
- Next, roll forth and back while pressing the outer edges with your hands, to form the pointed ends of the bolillo shape.
- Place the bolillo on a baking sheet lined with parchment paper.
- Repeat with each piece of dough, leaving about 1-inch space between each of them.
- Loosely cover with cling film and allow to rest until doubled in size (about 1 hour).
Bake
- Preheat your oven to 450°C (230°C) placing a baking dish or container with about 4 cups of water in the lower rack.
- Right before baking and using a very sharp knife, make a longwise cut to each roll and spray some water on top, to achieve a shiny and crusty texture.
- Bake for about 20 minutes, or until you’ll see bolillos are golden brown.
- Remove from the oven and place them in a cooling rack.
Notes
- Use bread or pizza flour with at least 11% protein for the best texture.
- Lukewarm water helps activate the yeast properly—neither too hot nor too cold.
- Let the dough rest if it resists shaping; a short pause makes it easier to work with.
- Leftover bolillos will last up to 3-4 days in a plastic container or bag. To restore their crunchy top spray them lightly with water and pop them in a 350°F (175°C) preheated oven for about 5 minutes.
Want to make bolillos with no yeast. Is there a way? Thanks.
How do you double
the dough is like a high hydration dough, or are the measurements of flour to water off?
Hi! No, it’s not a high-hydration dough, and the measurements are correct. What type of flour are you using? Is it bread flour? How much protein does it have?
Hi, if combine whole wheat flour & bread flour, what will be the measurement? Thanks.
Baking at 8000’ is always a challenge. These came out a bit dense but that’s not the recipes fault.
I think my yeast may have been a bit older than it should have been and the kitchen not as warm as it should be for a proper rise.
They look right and taste pretty good. I’ll get them right next time. Thanks.
About what size in length and width should these Mine came out a bit smaller than I expected so I’m wondering what size lengthwise the baked result should yield.
Wow these turned out so beautifully!! Thank you for an amazing recipe!
Can I use all purpose flour instead?
yes.
This looks so delicious. I have unfortunately have arthritis. I wanted to know if I can use a stand mixer for kneading the dough. How long would it be knead it for? Thank you
Hi Sonya, yes you can use the stand mixer. About 3-4 minutes should be enough or until the dough is smooth and soft.
I’m just going to say wow wow wow 🤯 the best recipe of bolillos ever. Thankyou, I need your social media
I forgot please let me know how you measure 2/3 tbls. Also on the 8 pcs recipe,I ordered some spoons but would still like to know how,in case im lost in the jungle! Thank you
3 teaspoons in a tablespoon so 2 teaspoons will be 2/3 tablespoon
Excellent, have made them several times now mostly in a 7” loaf for cuban sandwiches!! One question how or what do you use to measure 2/3 tsp for the 8 count recipe??
Definitely going to try this out but do you put the water in a baking tray in the oven and take it out when you’re ready to start baking, or leave it in during baking? Unfortunately my oven only has one rack and it’s an older oven so I’m not sure if placing a pan directly on the oven floor so to say would be dangerous.
Hi Angie, the water should stay while the bread is baking, but don’t use this method if you’re not sure your oven can handle the pot placed on the floor. What you can do is lightly spray each small loaf with water before baking, this is also a popular method for achieving the bright and crusty texture on bolillos.
Excellante!!!! First time I’ve made bread, when i saw this recipe it reminded me of the bread that was made by the Cuban bakers in my hometown of Key West Fla. We called the loaves,(appox 2 1/2 ft long) Cuban bread,this bread was called a “cuban coca” Those French people must have made a side trip to Cuba because the bread is the same texture and taste! Looked at about 5 recipes and choose yours glad i did!! Thank you Joe
I love this recipe! I’ve made it 3 times and they come out perfect. Used to buy these rolls at the store and it’s so awesome being able to make them at home.
Are you using fast or rapid rise yeast in this recipe? I ask because I noticed you’re not proofing your yeast, as you would with regular yeast. I made these to use for bbq sandwiches and they held up fairly well. I used traditional yeast, which I ended up proofing as I didn’t think it would work otherwise. They didn’t raise as much as I had hoped they would.
I also added vital gluten to my AP flour to increase the protein level and kneaded it for about 20 minutes in my KitchenAid to give it some added structure.
Please advise.
Hi Dee, I used regular yeast. Sorry, I don’t know the difference between fast or rapid rise yeast.
Rapid yeast no proofing.
Active yeast with water no more than 120f for water.
Add some sugar and yeast will proof in about 10 mins or less.
rapid yeast means you mix it in with the dry ingredients, as it does not require water or sugar and a waiting time separately as active yeast needs to be activated in warm water first.
Are you using fast or rapid rise yeast in this recipe? I ask because I noticed you’re not proofing your yeast, as you would with regular yeast. I made these to use for bbq sandwiches and they held up fairly well. I used traditional yeast, which I ended up proofing as I didn’t think it would work otherwise. They didn’t raise as much as I had hoped they would. Please advise.
Excellent! 😊
Hello,
I don’t have a big oven, can I spray / brush water on the bolillos before baking instead of placing a container with water? If so, how can I do it? Or which type of container I have to use?
Thank you
Hi Adri, you can place a small baking tray with some water under the rack where you’ll place the bolillos.
If you can’t, just brush them with water and bake them normally. The crust won’t be as crispy but they will be good anyway.
Can I use regular flour or does it need to be bread flour?
You can use all purpose flour as long as it’s not too weak, it should have at least 11% protein to work in this recipe.
How do you check how much protein is in your flour? If I use AP flour it says it is 3g protein per 1/4 cup. Is it the total combined of all the flour used in the recipe?
Hi Amy, in Europe flour packages include protein content for every 100g, you can maybe convert your cups to grams using an online converter.
Or you can use bread flour which usually has a high protein content (like 13-14% —for every 100g).
Also, according to King Arthur website, AP flour has about 11.7% protein, so you definitely can use their flour for this recipe. More of that here: https://www.kingarthurbaking.com/blog/2023/09/25/protein-percentage
Perfect recipe!
Made these today. Easy! Successful! Thanks so much!
Karen
My phone autocorrected my earlier comment
I meant to type “this” but my comment was changed to “enthusiasm”.
My question was: Will making the dough ahead of time affect texture or flavor?
Yes, the taste will become a little bit sour, like the one from sourdough bread. The texture can also change a bit but is hardly noticeable. And yes, you can make the dough the day before and place it in the fridge to proof overnight. In this case, you will need less yeast as the dough will have enough time to slowly raise (1 teaspoon would be enough).
The next day, remove the dough from the fridge, allow it to reach room temperature, and follow the recipe from step 8.
Can you make the dough ahead of time? Or will enthusiasm affect texture? Make it more sour?
These were delicious and so much easier to make than I expected. I’m not savvy with yeast breads so I wasn’t sure how it would turn out, but they came out beautifully golden, crisp, and soft on the inside. We used them to make Sonoran dogs.
Homemade Bread is surely the best. Would love to try your Bread recipe, which looks so perfect.
I can’t imagine my life without these… So glad that I found your recipe!
These look like they came just out of a bakery. Love them.
This turned out really perfect!! Thank you!
We made these rolls on the weekend and they turned out perfectly! Thanks for this awesome recipe.
Loved your bolillos recipe! I wish I could send you a photo because they not only came out delicious but the texture was perfect as in your photos!