

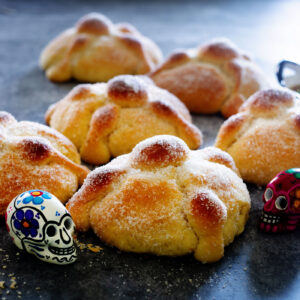
Pan de Muerto is the classic Mexican bread recipe for Day of the Dead. Light, fluffy, and fragrant with orange and butter, it’s topped with sugar and baked to honor loved ones with warmth and tradition.

Day of the Dead has always been my favorite Mexican holiday and ever since I moved away, I’ve tried to keep that part of my culture more alive than ever.
That’s why this sweet bread is never missing at my home during Day of the Dead celebrations.
This is the recipe I’ve been making for more than 20 years, and it has never failed me. We love to enjoy the sweet bread as in Mexico, with a large mug of hot chocolate or café de olla.
Ingredients
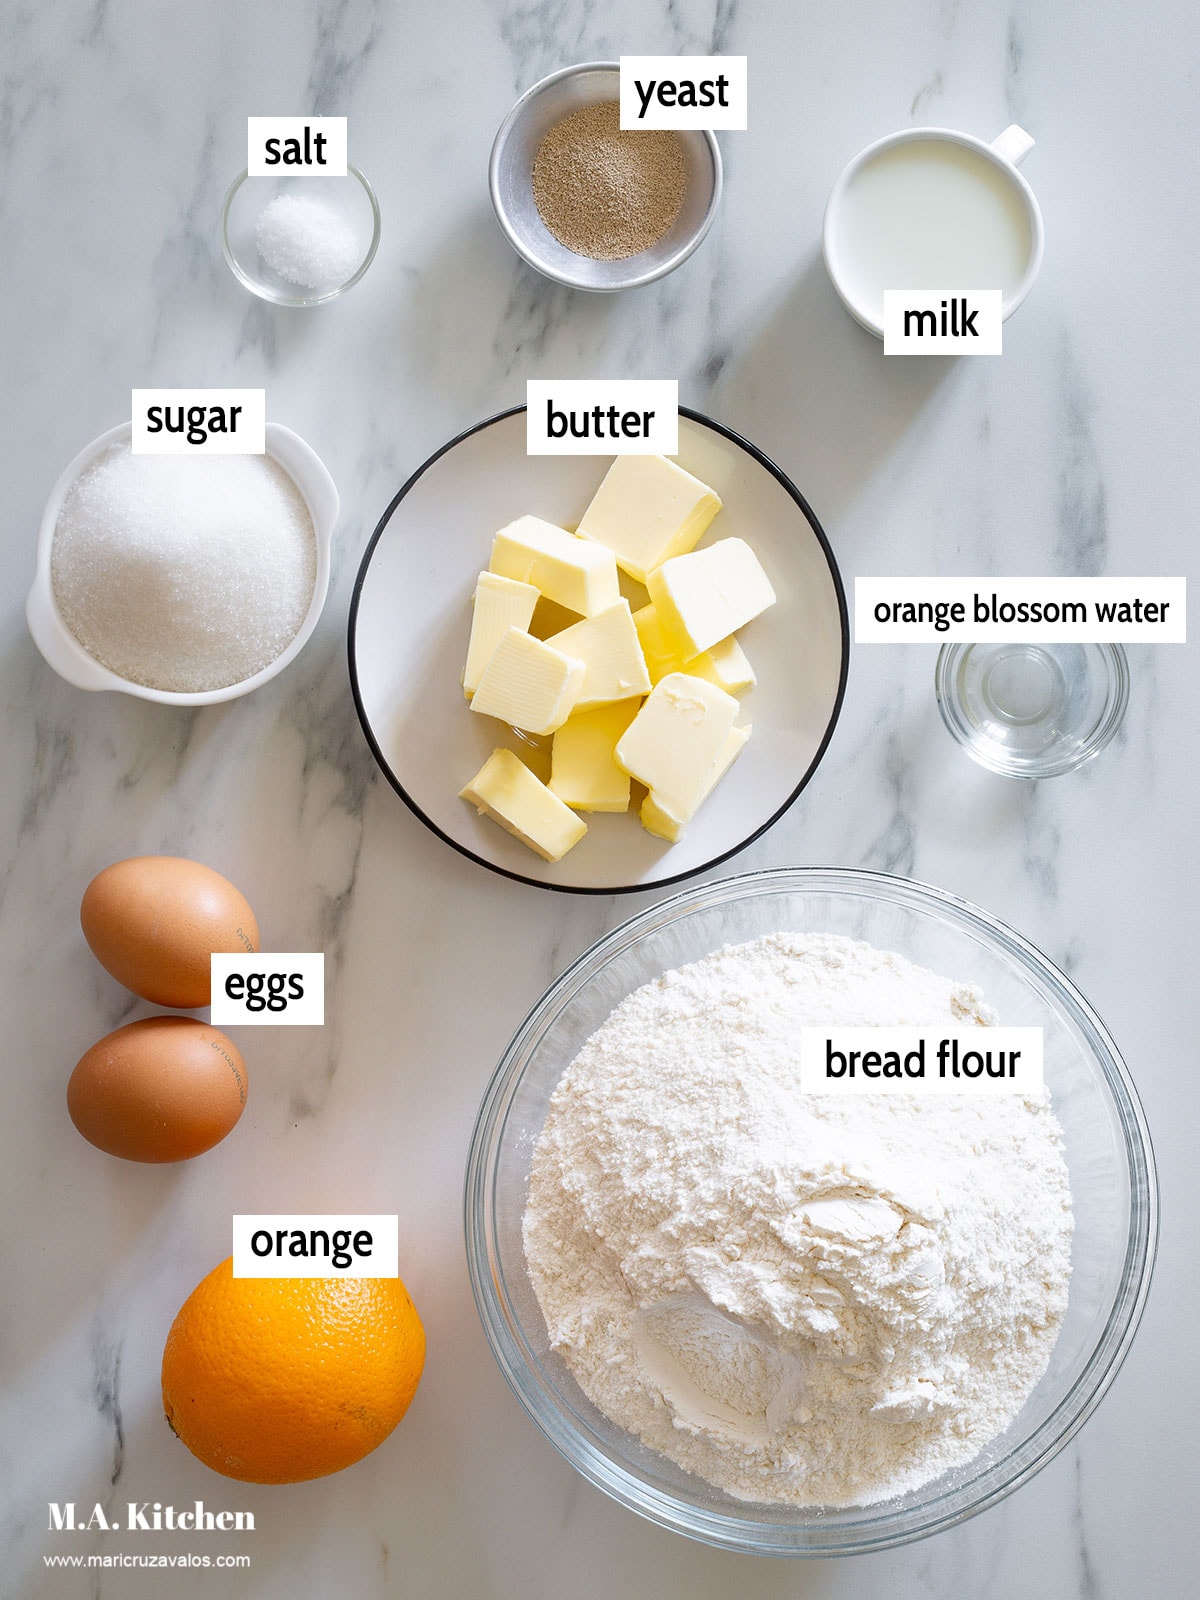
- All-purpose with at least 11% protein, or bread flour.
- Sugar for the dough and a little extra for dusting.
- Yeast.
- Eggs.
- Softened butter, for the dough and for brushing at the end.
- Whole milk.
- The juice and zest of one large orange.
- Orange blossom water, or substitute with rose water or even vanilla if needed.
- A pinch of salt.
How To Make Pan de Muerto
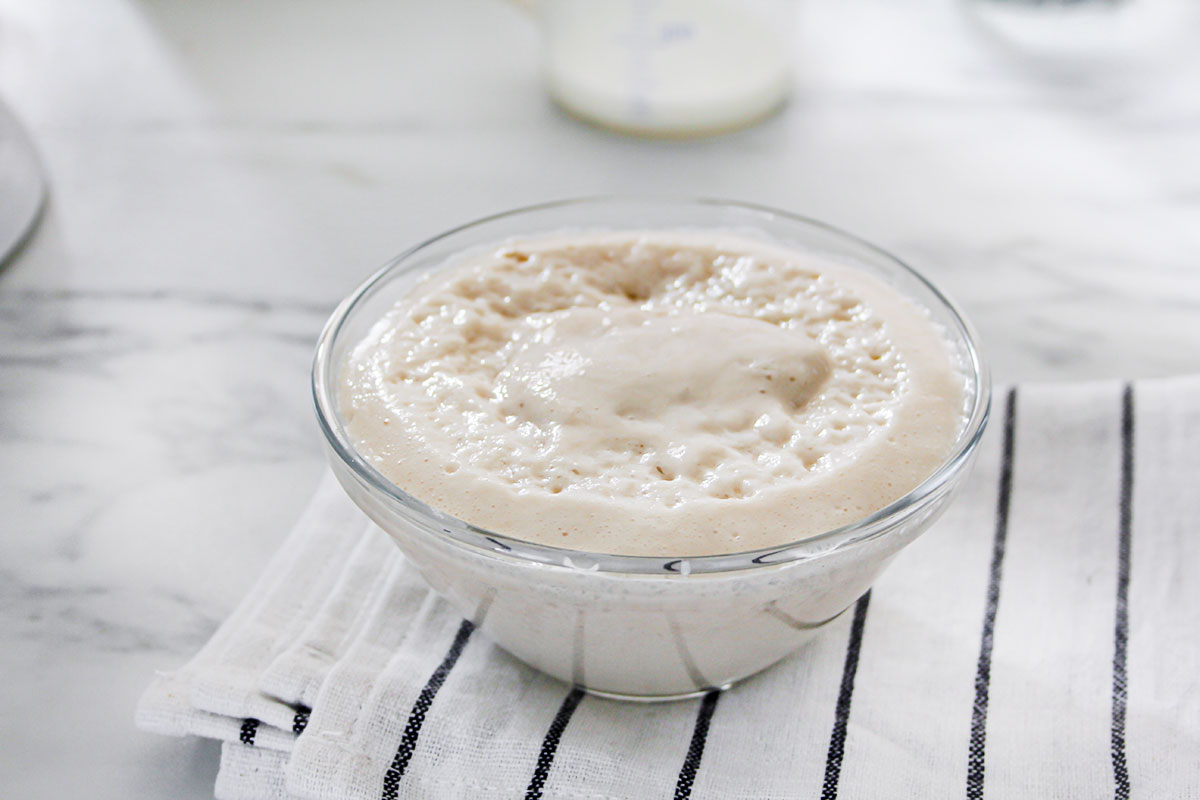
To start, mix lukewarm milk with the yeast, a spoonful of sugar, and a little flour. Stir until you have a smooth paste with no lumps.

Cover it and let it rest about 15–20 minutes, until it gets foamy and bubbly. That means your yeast is alive and happy.
In your mixer bowl, sift the flour, add the rest of the sugar and a pinch of salt. Give it a quick mix.
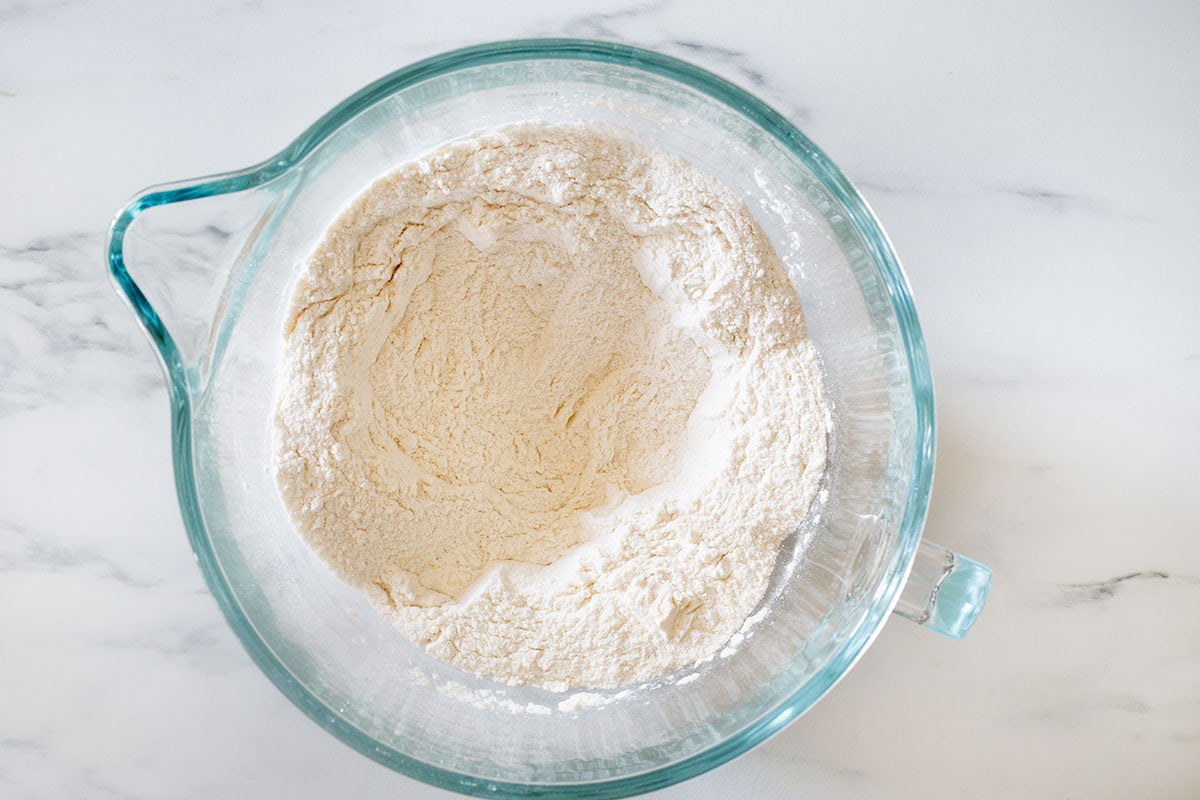
In another bowl, whisk the eggs with orange juice, orange zest, and a splash of orange blossom water (this is what gives pan de muerto its traditional aroma—so Mexican and so special).
Pour this mixture into the flour and mix slowly until combined.


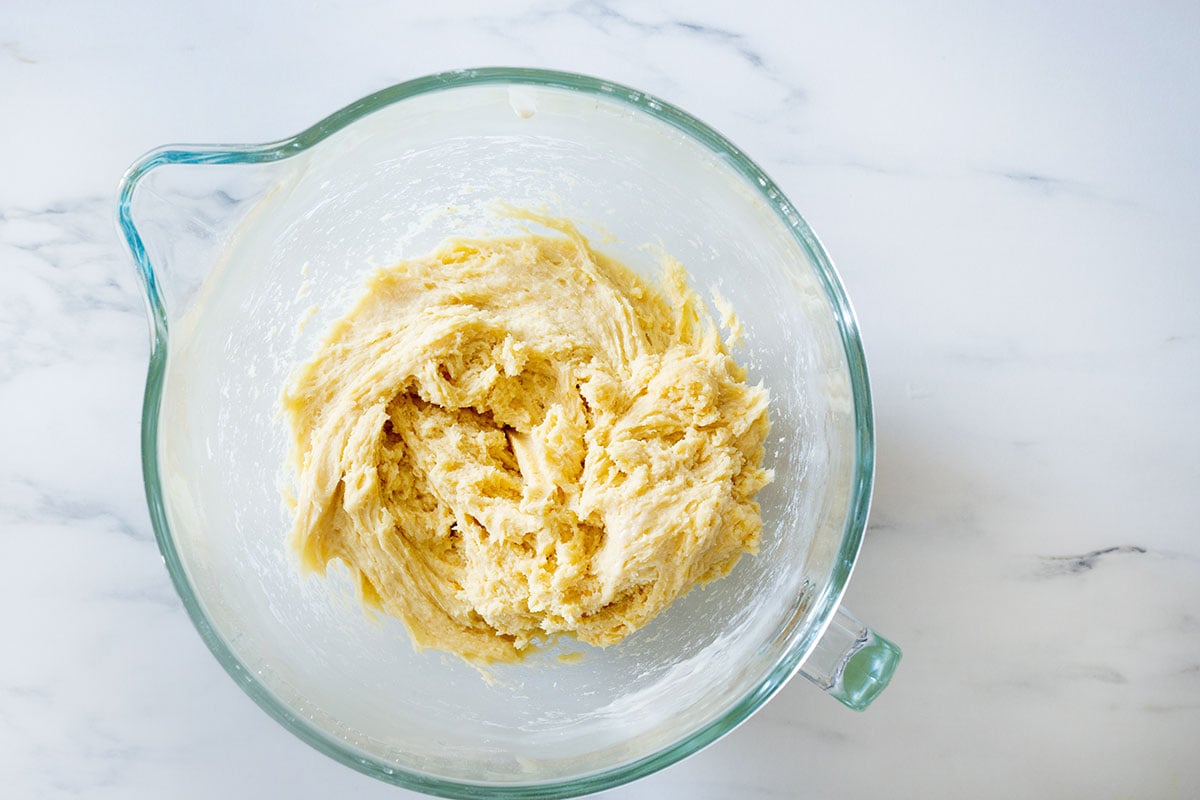
Add the softened butter and knead at medium speed until it forms a rough dough that doesn’t stick to the bowl (about 3-4 minutes).
Now add the softened butter and knead until the dough starts to come together.
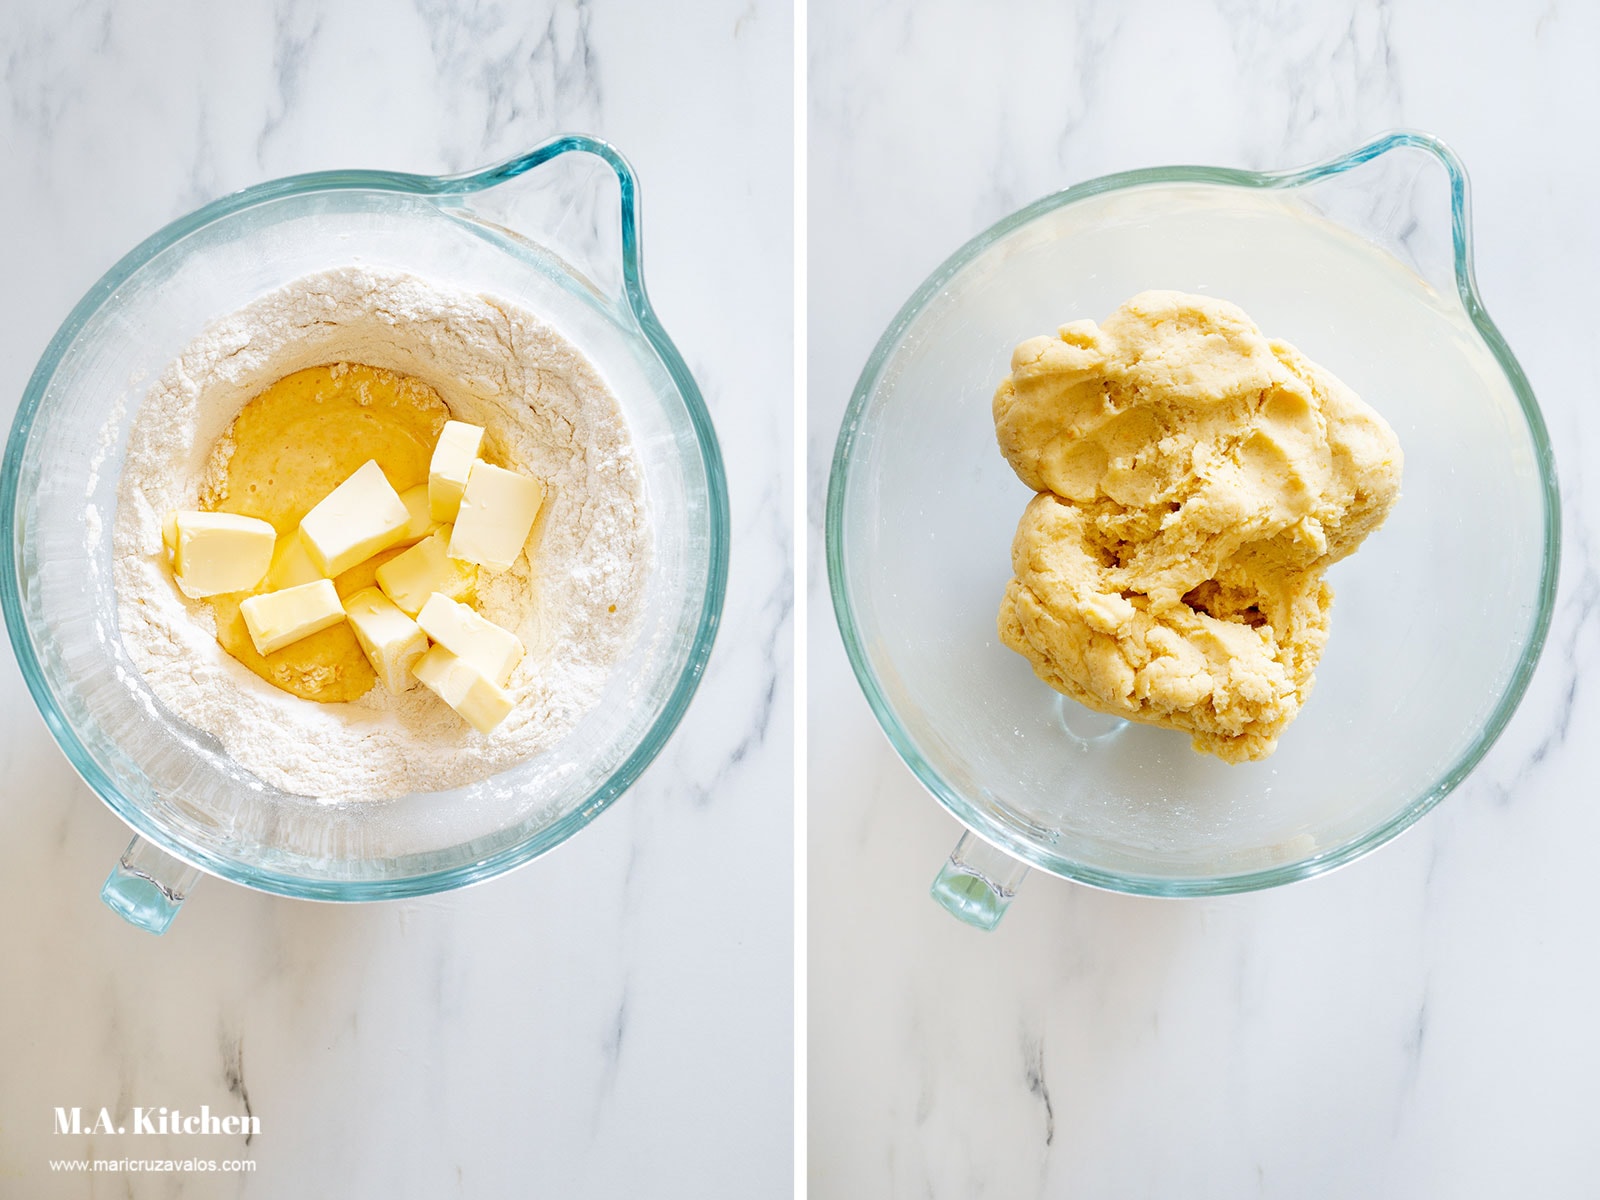
Add the yeast mixture you prepared earlier and knead a bit more.
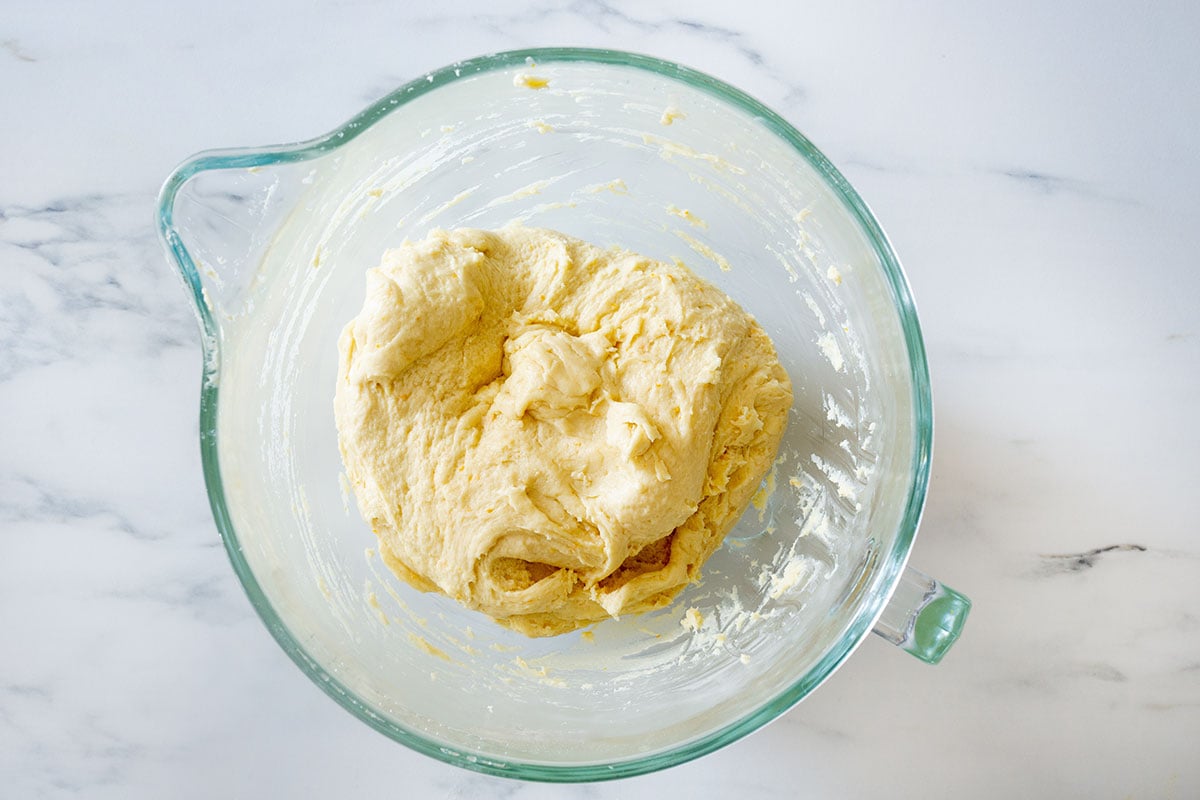
The dough will feel sticky at first (don’t be tempted to add extra flour!). After resting, it will be easier to handle.
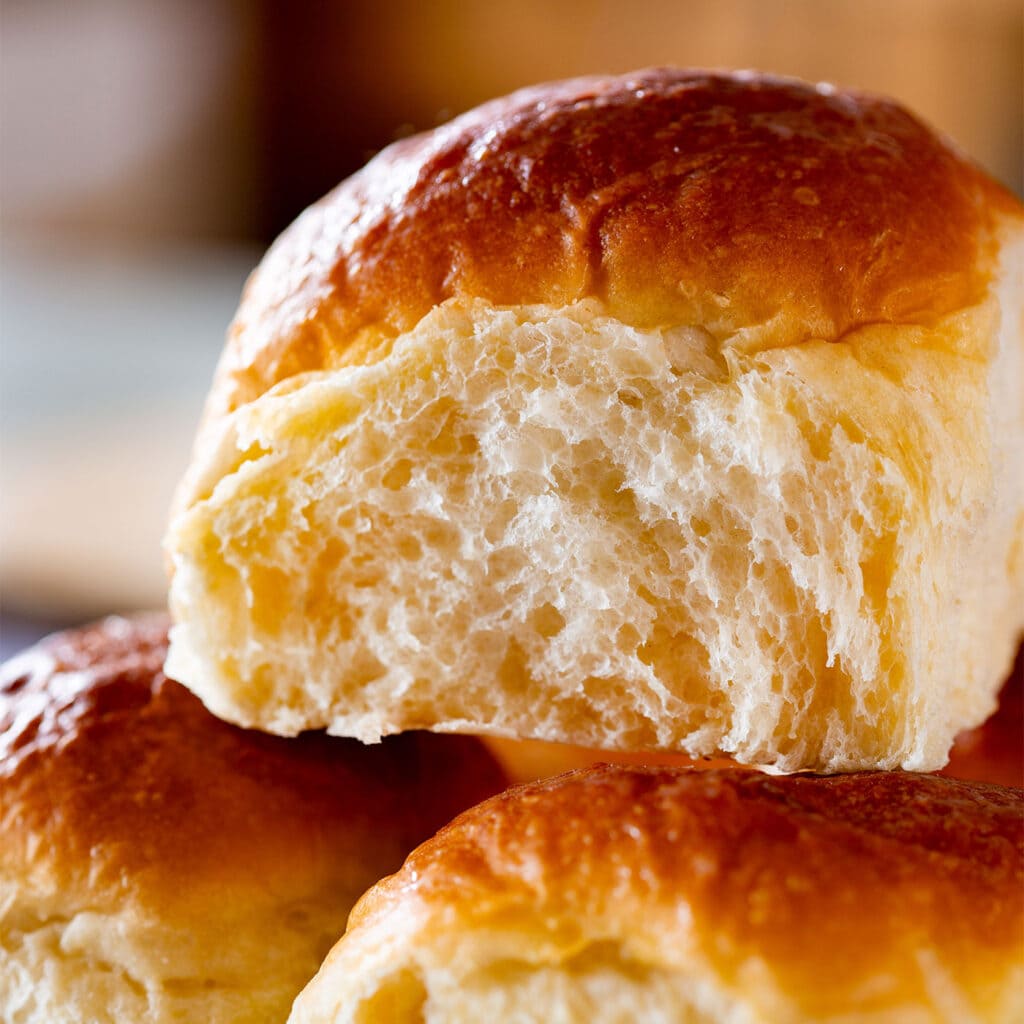
Keep kneading until it looks smooth and elastic. Like this:
Form a ball with the dough and place it in a greased container.
You can use the bowl of your mixer or just a plastic container with a lid, whatever works for you.
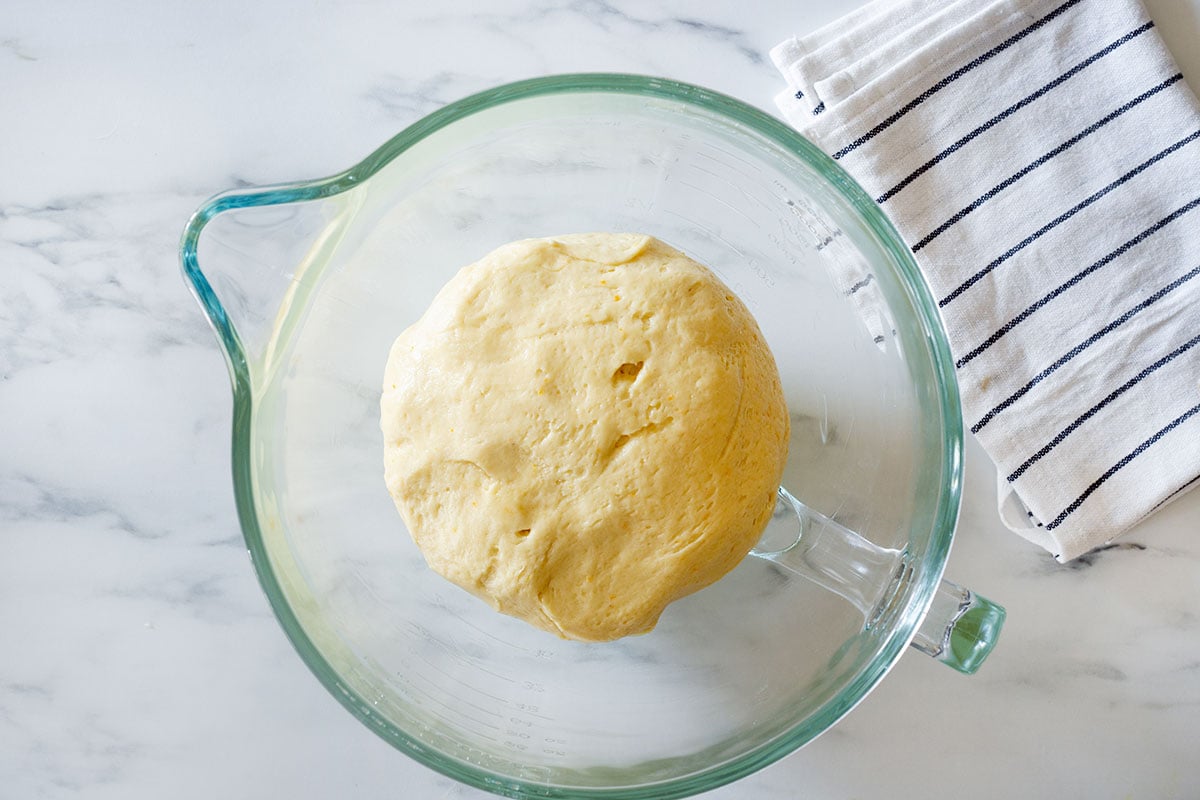
Leave the dough to proof in a warm place until it has doubled in volume (about 2 hours if the room temperature is about 75°F/24°C).
Tip: You can leave the dough inside your oven with just the light on, the gentle warmth helps it rise beautifully without drying out.

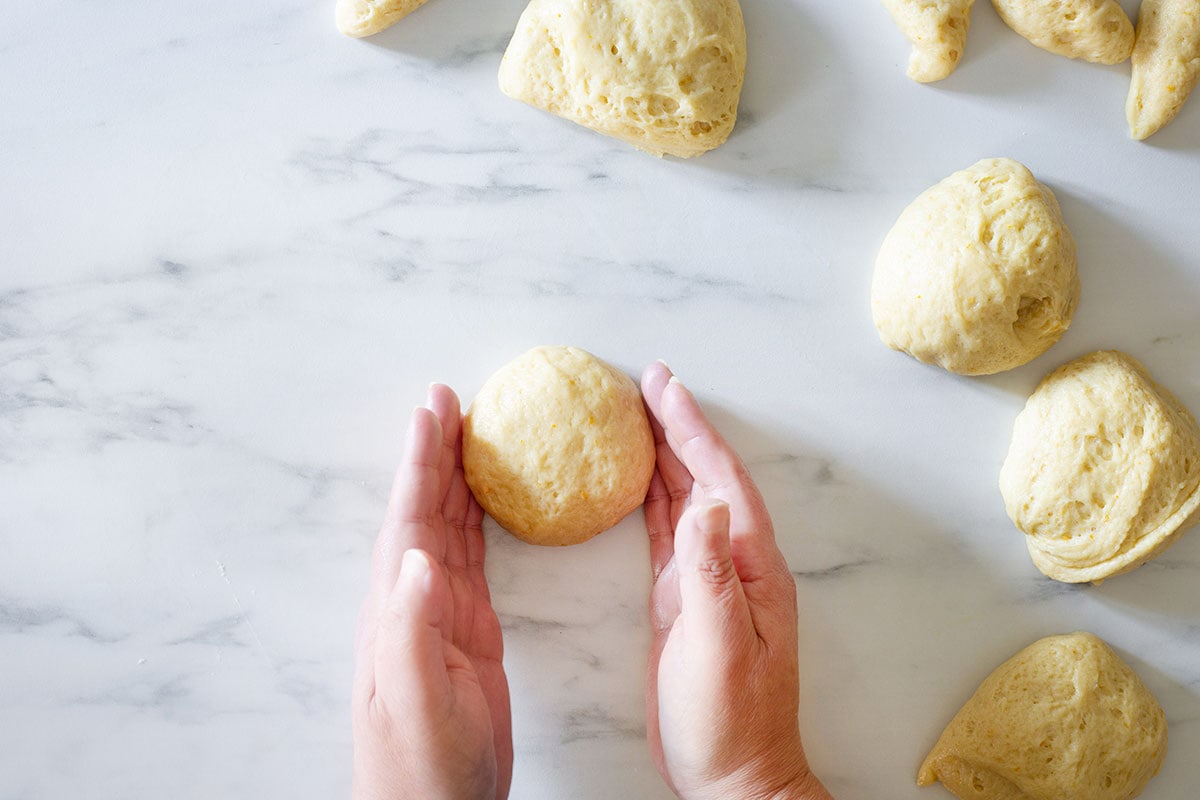
Slightly butter a working surface and place the dough on it, then divide it into 6 portions the same size. Use a kitchen scale for this purpose.
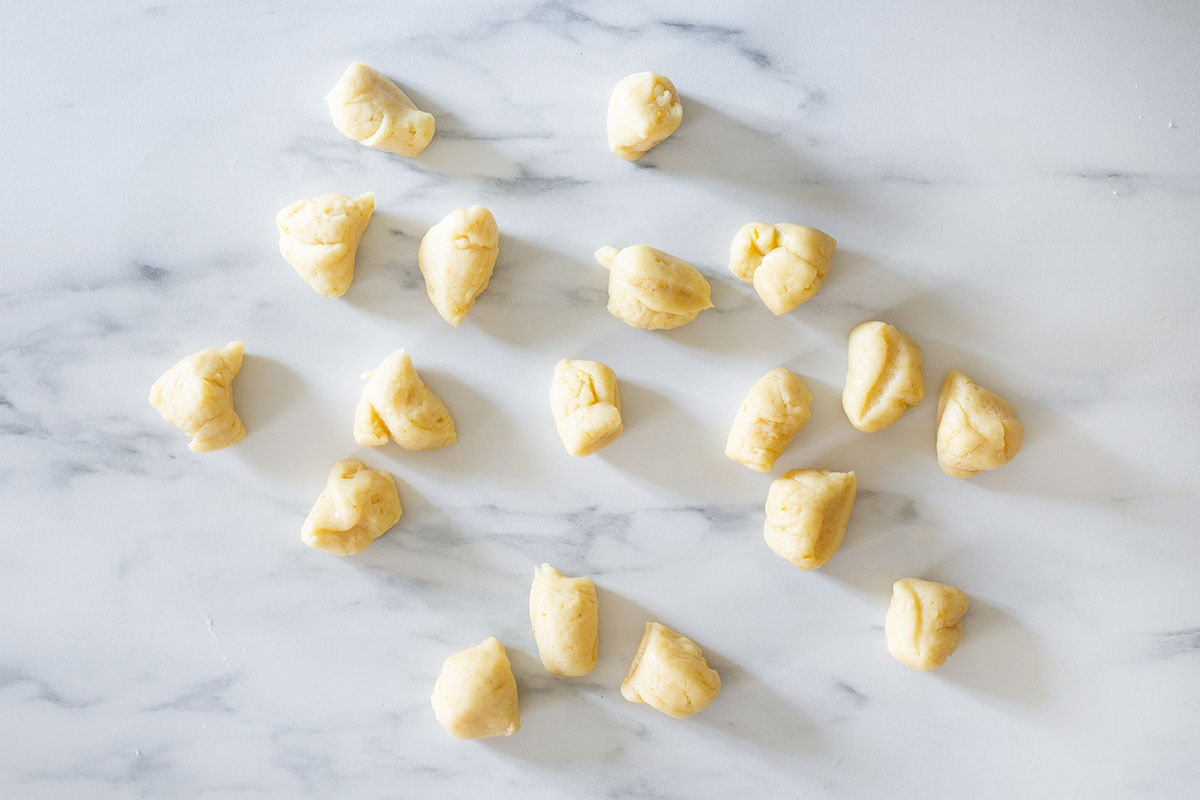
From each piece, save a little bit of dough to make the “bones.”


With the larger portions, form small balls using your hands. Rub a little oil on your hands to keep the dough from sticking!
Note: This recipe makes 6 medium buns, just the right size for sharing. But if you prefer larger loaves, simply divide the dough into 3 or 4 portions.
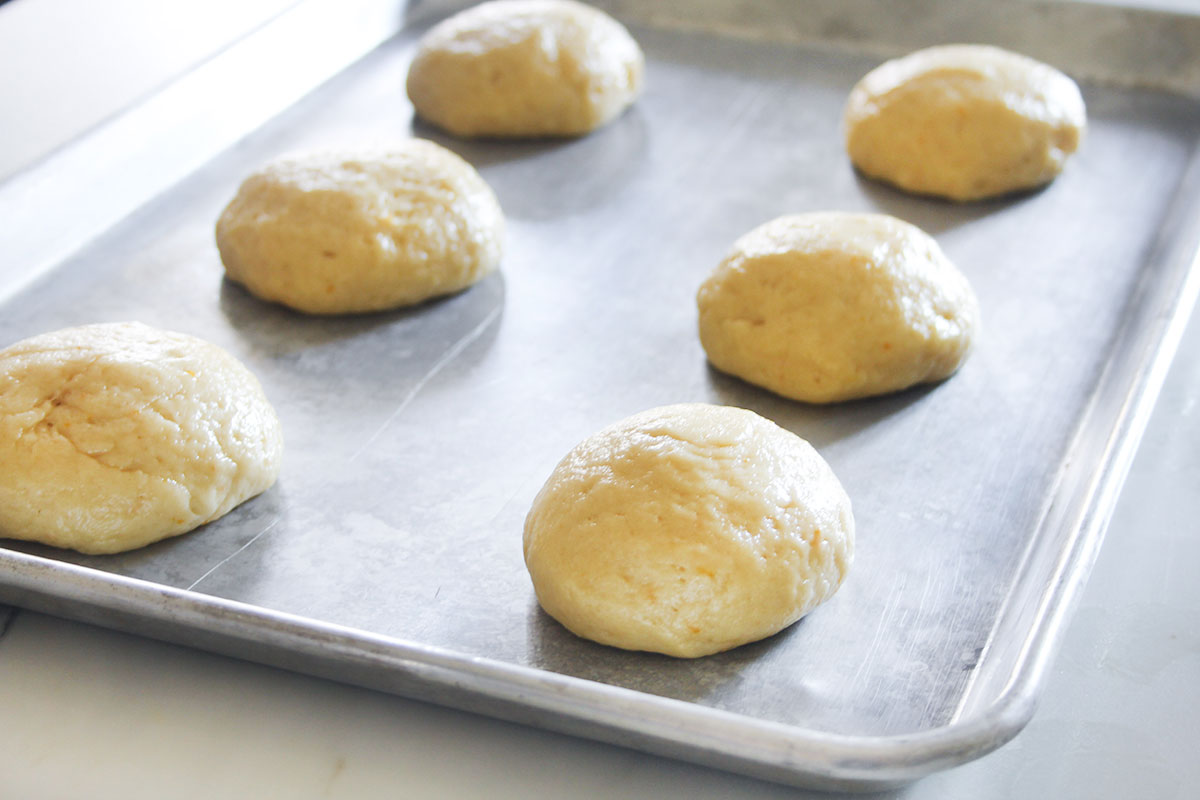
Now, place the dough balls in a large baking tray lined with parchment paper or lightly buttered.
Now, divide the 6 small portions of dough you took before into 3 pieces each, so you’ll end with 18 pieces the size of a hazelnut.
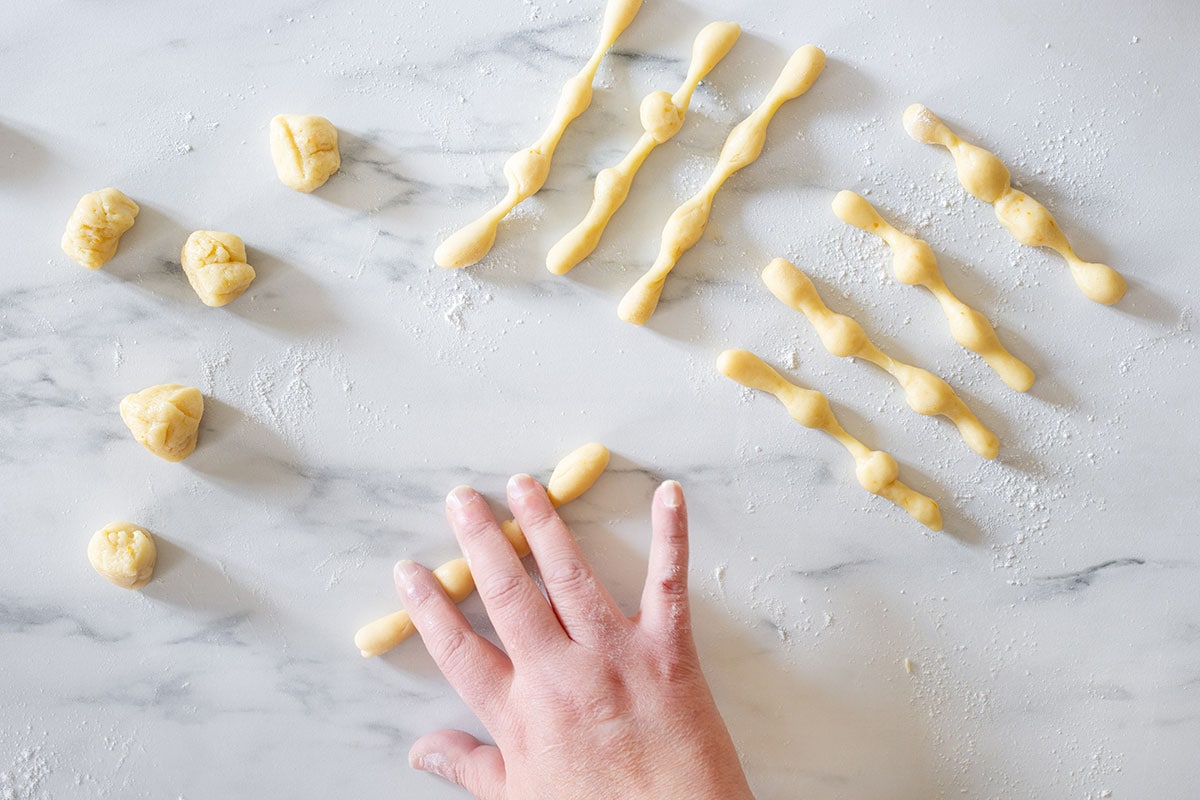
With the smaller pieces, shape 12 thin ropes and press lightly with your fingers to form the bone shapes.
Top tip: Sprinkle a bit of extra flour on the small dough pieces. This makes them firmer, easier to shape, and helps them keep their form while baking.
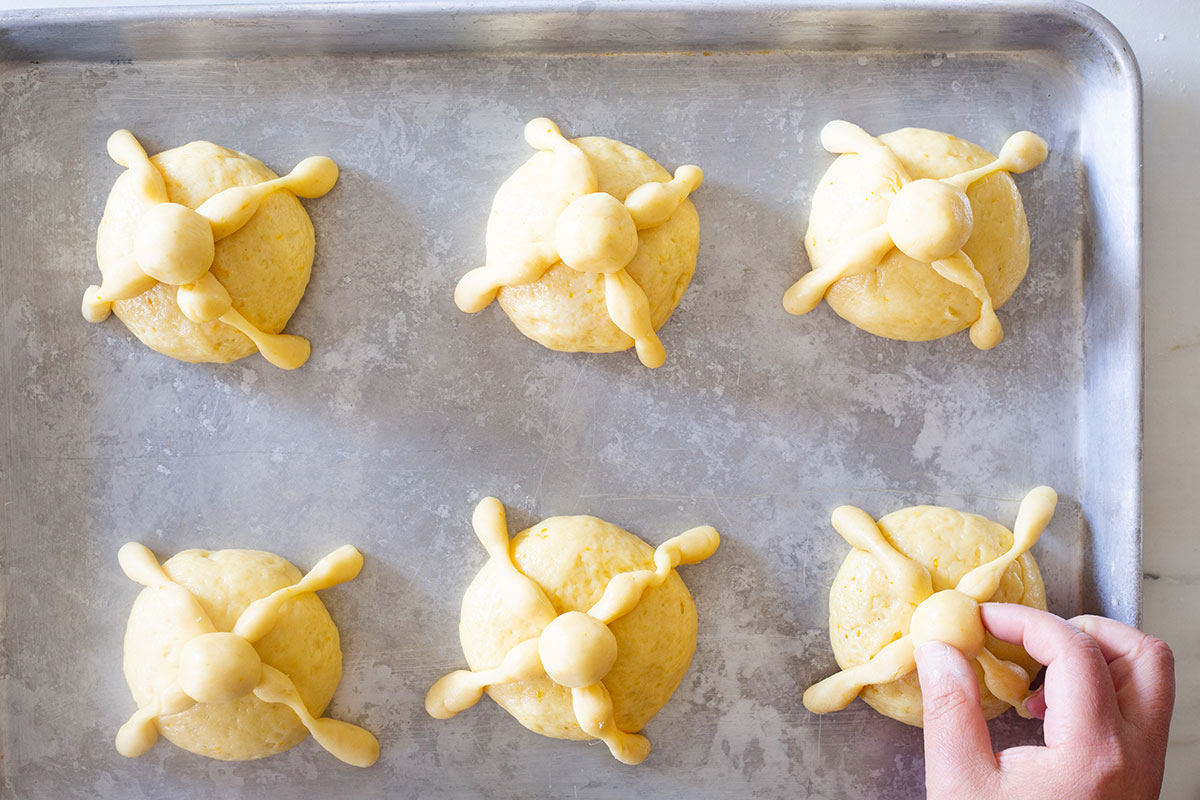
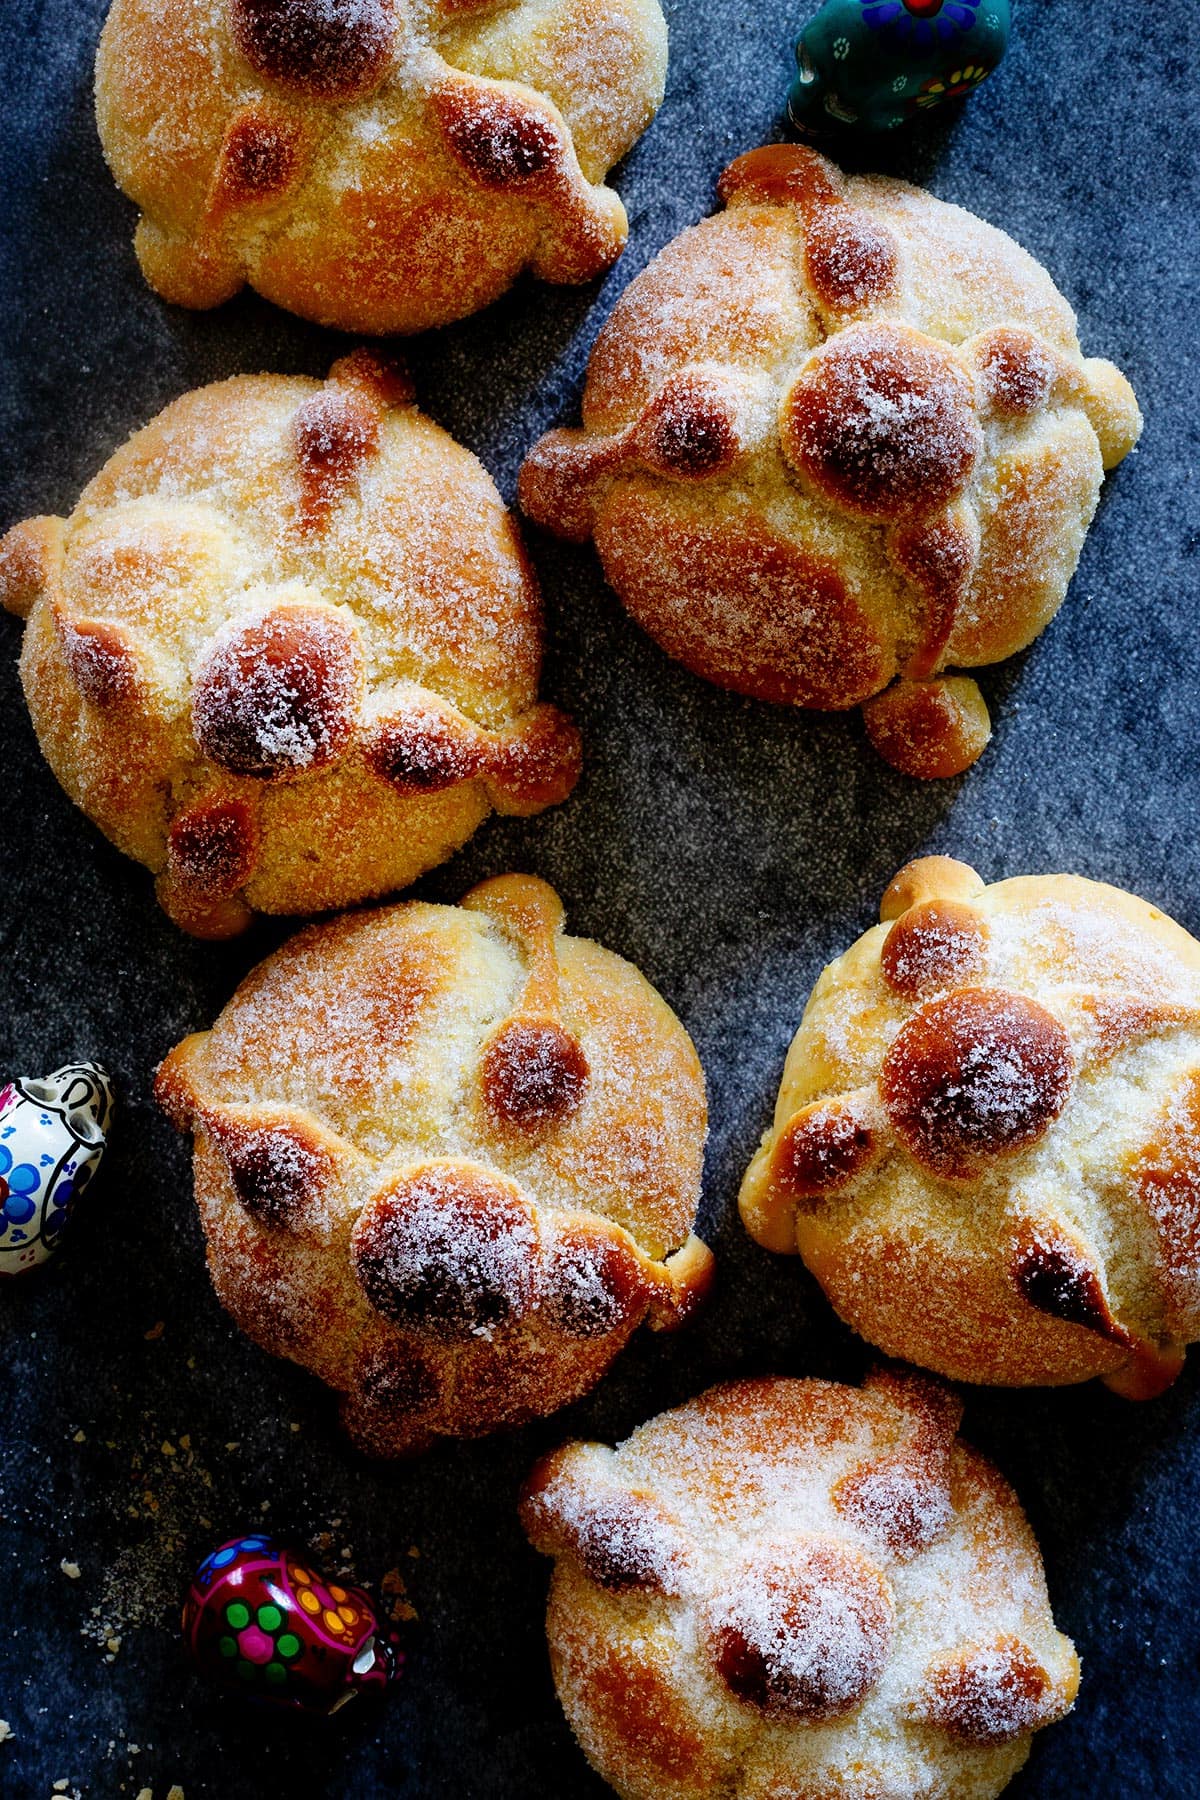
Cross two “bones” on top of each dough ball, pressing slightly to stick them.
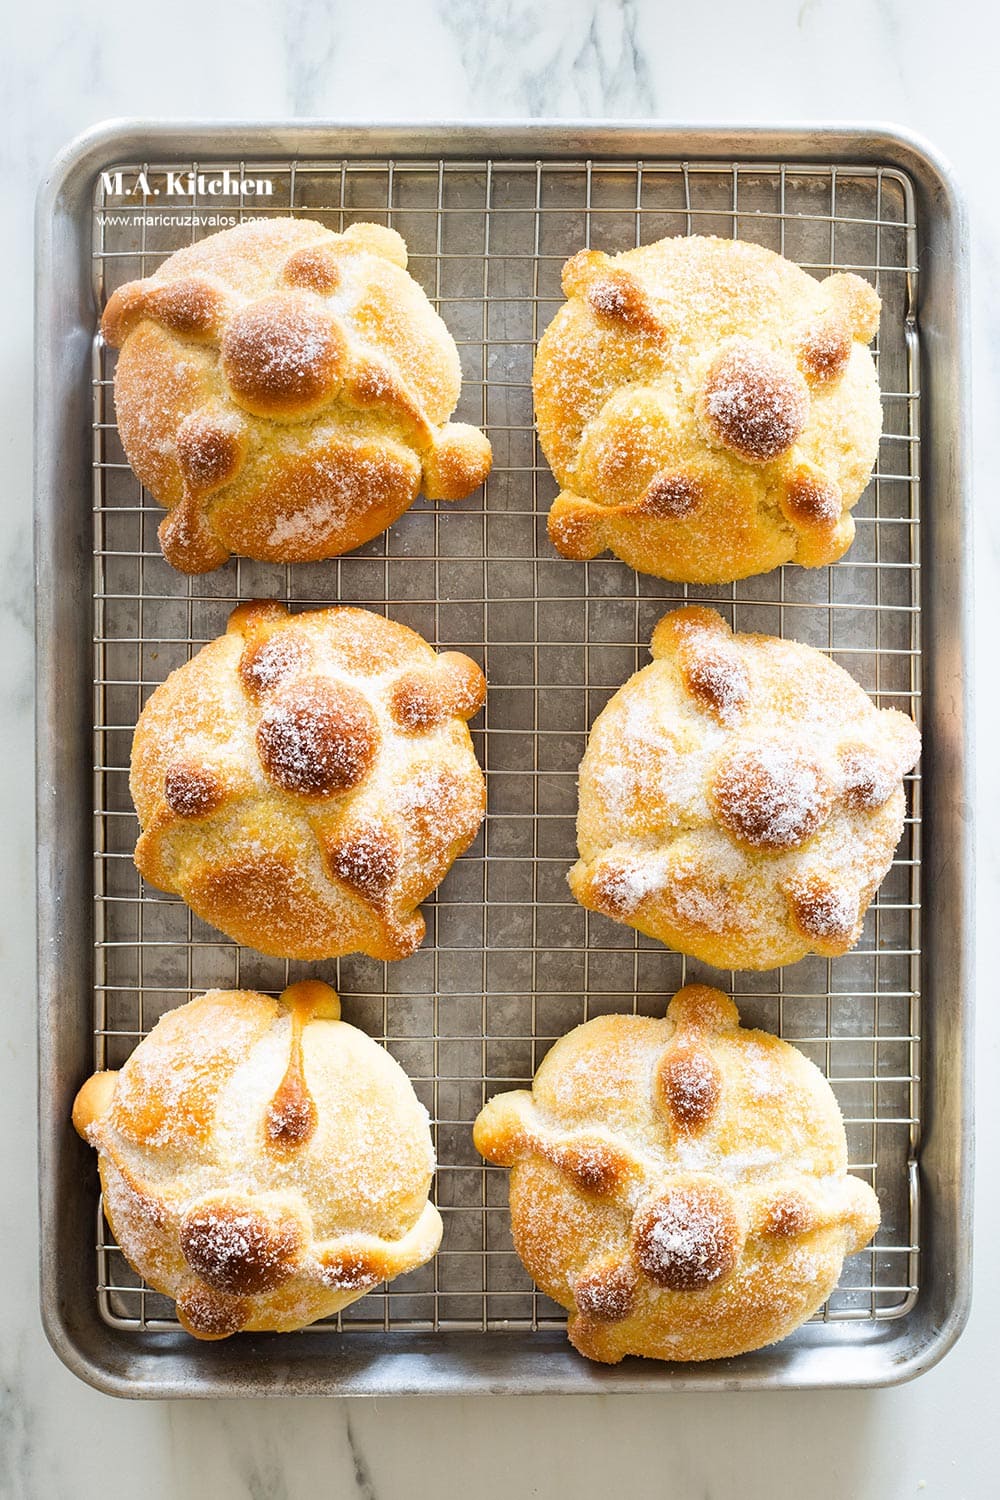
With the remaining small portion, form a small ball and place it on top of the cross. This is the traditional decoration of Bread of the Dead.
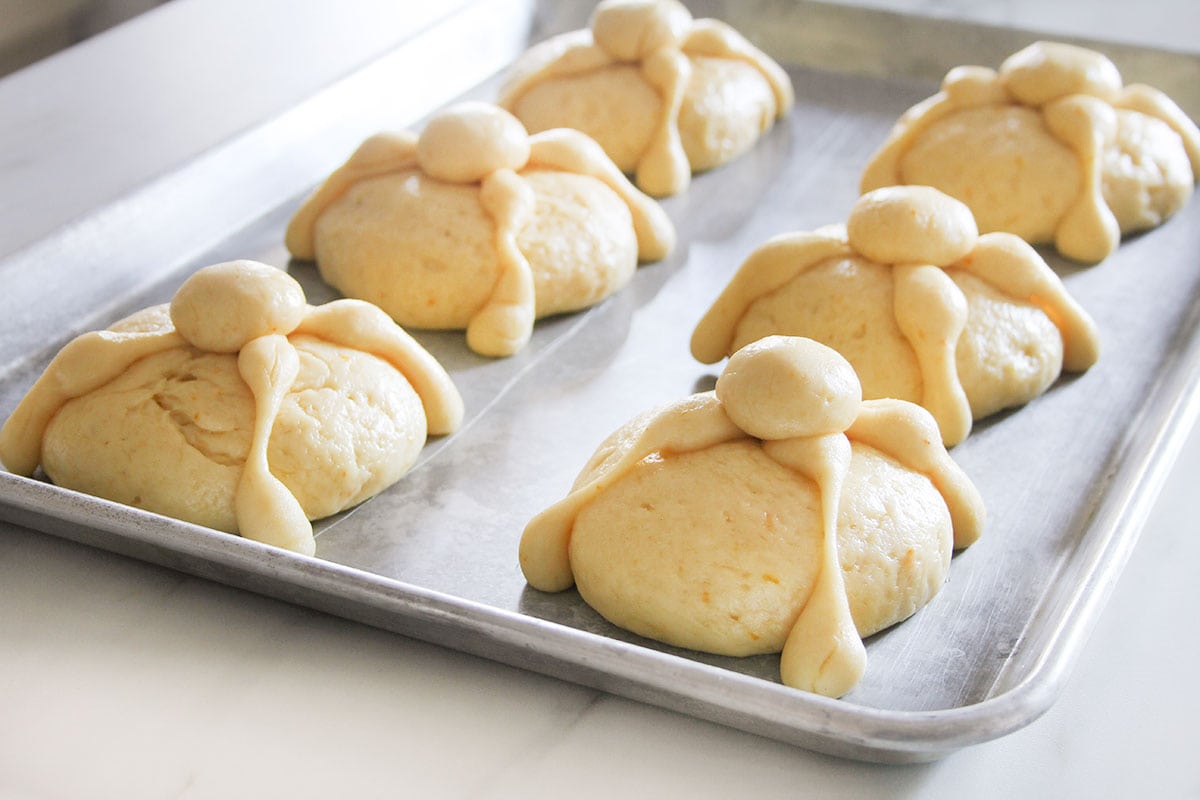
Cover the loaves with a clean cloth and let them rise again until almost doubled, about 30 minutes.
For a shiny crust with a light crunch, brush your Pan de Muerto with an egg wash (1 egg + 2 tablespoons water) before baking.
You can even sprinkle a few sesame seeds if you like—that’s also a very traditional touch.
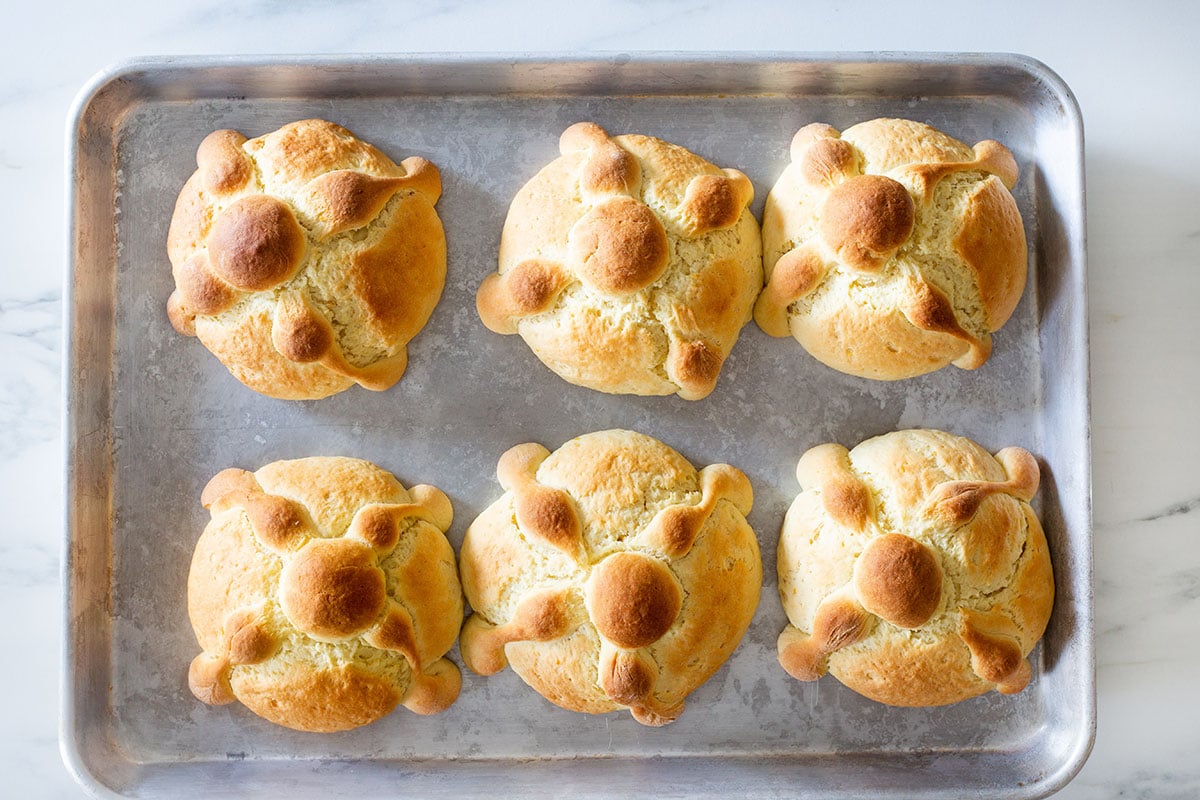
Preheat your oven to 360°F/180°C and bake for about 16-18 minutes. Or until the top is golden brown.
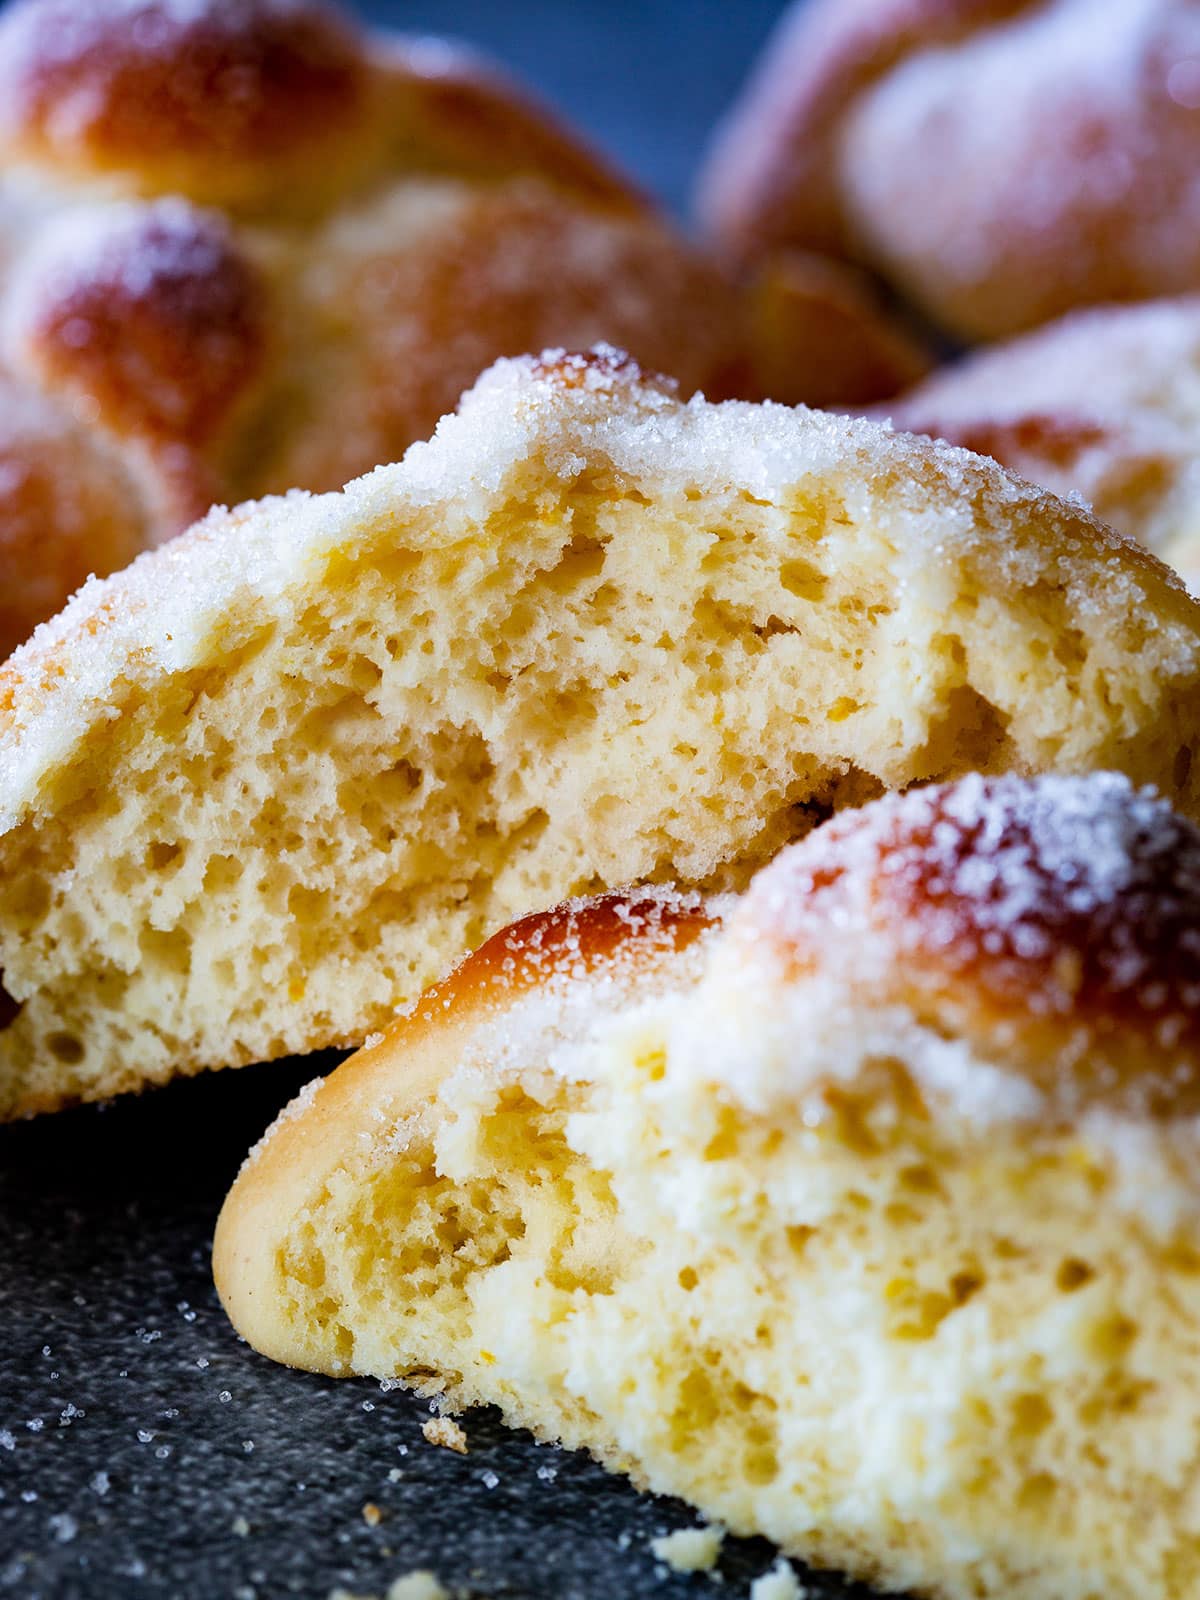
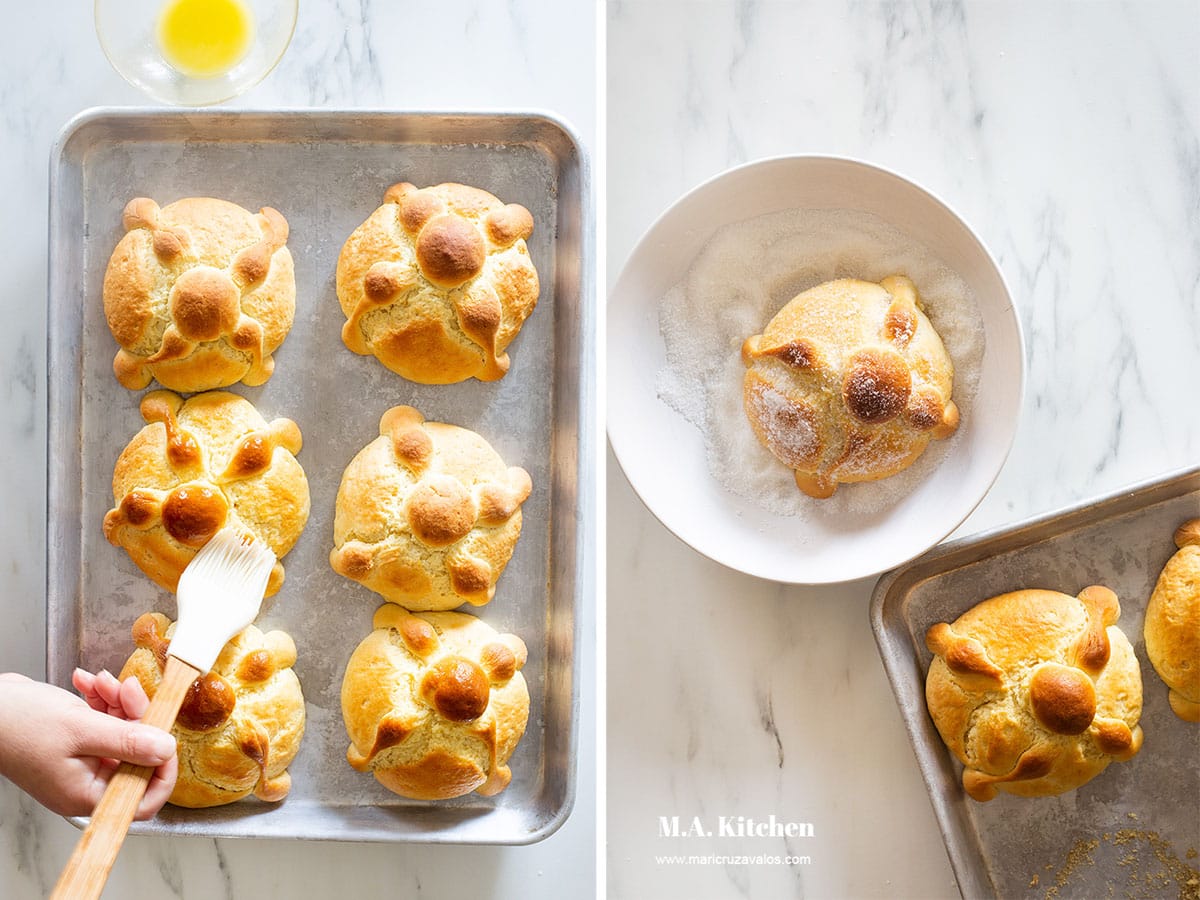
Let them cool for a few minutes, then brush with melted butter and dust generously with sugar.
That sweet crunchy topping is what makes this Pan de Muerto bread irresistible.
Let them cool completely on a rack before slicing (though honestly, it’s hard to resist tasting while still warm).
This Pan de Muerto recipe will fill your kitchen with the scent of orange, butter, and tradition. A true taste of Mexico to share with your loved ones.
The classic way it? With a mug of coffee, hot chocolate, or champurrado!
Because there’s nothing better than dipping a piece into that creamy, chocolatey goodness.
Storage Suggestions
Once completely cooled, store your Pan de Muerto in an airtight container on the countertop, away from heat and sunlight. It will stay soft and delicious for 4–5 days.
Want to save some for later? Wrap each bun in plastic, place 3–4 in a resealable bag, and push out the air. Freeze for up to 2–3 months.
Let the buns thaw on the counter overnight. Give them a light spritz of water, then warm gently in the oven until soft and fragrant, just like freshly baked.
Similar Recipes

Have you tried this Pan de Muerto recipe? Rate it and leave a comment below to let me know how it turned out! And follow on TikTok, Facebook, Pinterest, YouTube, and Instagram.
Video
Print this recipe
Pan de Muerto Recipe
Ingredients
- 4 cups bread flour
- 5 oz butter (cut into small pieces )
- ¼ cup lukewarm milk (or water)
- ¼ cup orange juice
- ¾ cup sugar
- 1 ½ tsp yeast
- 2 medium eggs
- ½ tsp salt
- 1 tsp orange blossom water (or vanilla extract)
- 1 tsp orange zest
for decorating
- white sugar
- melted butter
Instructions
- Place milk, yeast, 1 tablespoon sugar, and 3 tablespoons flour in a bowl. Stir until smooth and lump-free. Cover with cling film and set aside until foamy (15–20 minutes).
- Sift the flour into a stand mixer bowl. Add salt and remaining sugar. Mix briefly with the hook attachment.
- Whisk the eggs with orange juice, orange blossom water, and orange zest in a small bowl.
- Make a well in the flour and pour in the egg mixture. Mix 1 minute on low speed.
- Add softened butter and knead at medium speed until a rough dough forms (3–4 minutes). Add the yeast mixture and knead at medium-low speed for 5 minutes.
- Increase speed to medium-high and knead 15 minutes, until smooth but slightly sticky.
- Form a ball and place in a buttered container. Cover and let rise in a warm spot until doubled (about 2 hours).
- On a lightly buttered surface, divide dough into 6 portions. Set aside small pieces for decorations. Roll the larger portions into balls and place on a parchment-lined or buttered tray.
- Divide the small pieces into 3 pieces each (18 total). Flour your surface and hands. Roll 12 pieces into ropes to form “bones.” Cross two bones on each dough ball, and place a small dough ball on top.
- Cover with a cloth and proof until almost doubled (about 30 minutes).
- Preheat oven to 360°F/180°C. Bake 16–18 minutes, until golden.
- Let cool 15 minutes, then brush with melted butter and sprinkle with sugar. Transfer to a wire rack to reach room temperature before slicing.
Notes
- For a shiny, slightly crisp crust, brush the buns with an egg wash (1 egg + 2 tbsp water) before baking.
- You can make the dough entirely by hand, but it will take about 30 minutes of kneading.
- Proofing time depends on your kitchen’s warmth; a cozy trick is to let the dough rise in the oven with the light on.
- This recipe makes 6 medium buns, or 3-4 larger loaves if you prefer, just remember bigger loaves need a bit more time to rise and bake.
This pan de muerto is my fall favorite! The citrusy, buttery goodness and sugary crunch make it irresistible. It’s buttery and light!
Can’t wait to make it again! I made it last year and was a success! So happy to repeat it :)
This was so GOOD! I made a batch as test so I could make it for day of the dead season and bring to the office and now I am ready because it came ou perfect- Soft, orang-y, not overly sweet.
Thank you for sharing this authentic recipe and its history! My family and I just got back from Spain for my youngest son’s surgery. My older kids have been showing a much bigger interest in Spanish, Mexican, and Hispanic culture since we got back, and were just asking about Day of the Dead this week. I know they’ll enjoy helping me make some Bread of the Dead.
Love this! So easy to make and everyone here loved them, thanks for the recipe!
Tasty and perfect for Halloween or any day actually. So soft and fluffy
This sounds absolutely amazing! I had pan de muerto for the first time a couple of years ago, and I’ve been wanting to try making it ever since.
This bread is beautiful! It is interesting how different regions have different versions.