

This ligurian focaccia is so fragrant, crunchy on the outside, soft on the inside. And it can be made easily at home, even if you haven’t made any focaccia bread before!.

What is ligurian focaccia?
The ligurian focaccia (fugassa in the local dialect) is an italian bread full of history and tradition. The recipe comes from the region Liguria in the north-western Italy.
The texture of this focaccia is oily, soft in the inside and crispy on the outside. Is very fragrant and salty and is eaten along the day by locals. In the morning dipped in a cappuccino (yes, dipped), at lunch, in the afternoon as a snack or at night with dinner. There’s no wrong time for eating Fugassa.
“Focaccia alla genovese” (ligurian focaccia) has it’s own tradition. In the Middle Ages it was eaten in church during marriages and also in funerals, much to the clergy dismay that later forbidden it’s consumption in church.

A quick note before starting
The recipe that I am sharing with you today is as close as possible to traditional ligurian focaccia, it is a homemade version so please keep that in mind.
If for some reason (more unlikely) you’ll have leftovers and it has hardened slightly, you can prepare sandwiches (for example with peperonata and mozzarella). Grill them to soften focaccia.

The ingredients
*You can find the exact measurements of ingredients below, in the recipe card. Please, please, even though I wrote the measurements in US cups, please use a kitchen scale for better results.
FLOUR. Use a strong bread flour like Manitoba. All purpose flour is just too weak to make a good focaccia. A strong flour should be about 11% protein and above, not less.
OIL. A good italian olive oil would be enough or a mild flavour extra virgin olive oil. Just make sure the oil is not too strong that will compromise the focaccia flavour.
SALT. Use refined salt only to make the dough and the brine, then use coarse salt for sprinkling on top.
YEAST. I used active-dry yeast but I have also made this focaccia using instant dry yeast or even sourdough.
WATER. It has to be at room temperature. Do not use cold or hot water as you’ll compromise the texture. Something between 19-22°C (66-71°F) would be perfect.
SWEET. Malt is used often in italian bakery and I used that, but if you don’t have it on hand just use honey or sugar instead.

Step by Step Recipe
Make the pre-fermented dough (biga)
Prepare the biga by placing 150 gr (1 cup) of flour, yeast, malt and 85 ml of water in a bowl.
Knead until the ingredients are combined. Form a ball, make a cross cut on top and let it proof for about 2 hrs. Depending on the temperature ( recommended: between 24 to 28 °C /75-82°F).

If the weather is too cold you can place the bowl it inside the oven (turned off) with the light on to make a warmer environment.
You need to have a double-sized dough after two hours.

Make the dough
Add the remaining flour into the bowl of an electric mixer. Add the pre-fermented dough and the rest of the water, start kneading at low speed until the ingredients have amalgamated and formed a compact dough.

While the mixer is still kneading, pour the olive oil slowly and knead until it has been absorbed. Add the salt and continue kneading for a minute.
At the end you will obtain a soft and elastic dough. Form a ball, cover the bowl with a clean damp kitchen towel and leave to proof in a warm place until it has tripled in volume.

Roll the dough
Sprinkle a countertop with flour. Put the dough and slowly roll it into rectangular shape (use also your hands).

Grease a 14×17″ (35x40cm) baking tray and place the dough on it. With the help of your hands try to shape the dough almost the same size of the tray. Cover with plastic film and leave it to proof for about 50 minutes.

After the resting time, you will notice that the focaccia has expanded covering almost all the tray. If necessary, pull it a little towards the corners so there won’t be any part of the tray uncovered. Cover again and let it proof 30 to 40 minutes.

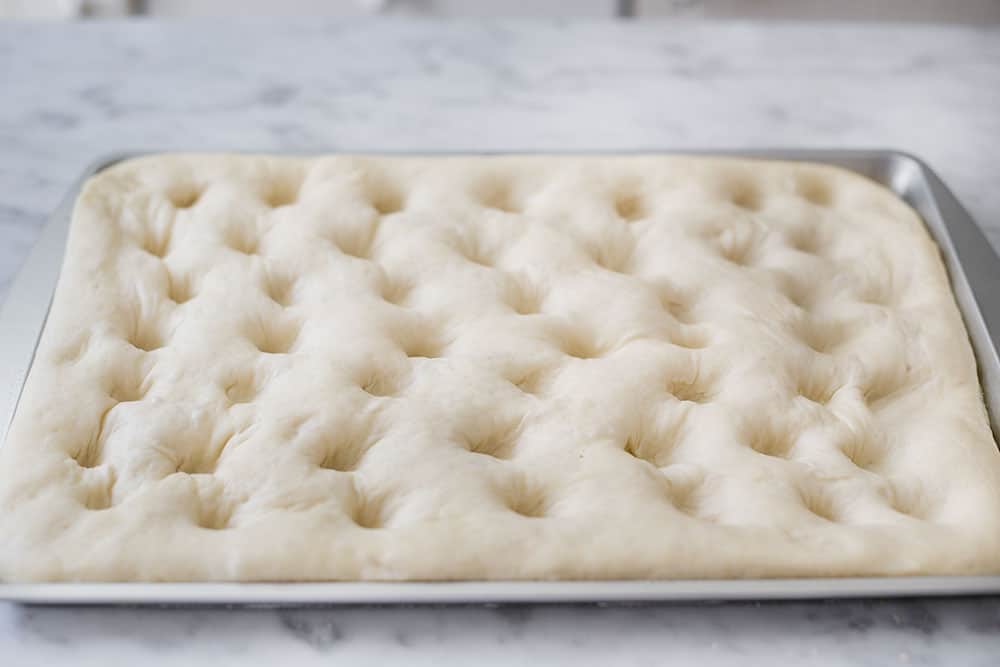
After the proofing you’ll notice the focaccia has really puffed so it’s time to make the traditional little holes.
Coat your hands with oil and dimple the dough by pressing the pads of your fingers down, little spreading them out when they hit the bottom. Try to be gentle doing this as you don’t want tear off the dough.
Make the brine
Prepare the brine by pouring the water in a glass. Add one teaspoon of salt and two tablespoons full of olive oil. Mix until salt is dissolved.
Pour the brine all over the focaccia. Don’t worry if it looks like is a lot of liquid. It will evaporate later during baking.
The last proofing
Leave the focaccia rest for about an hour (while you preheat the oven). This last proofing allow the dough to absorb some of the brine, giving a wonderful taste as a result.
Once one hour has passed. Add the last drizzle of olive oil over the focaccia and sprinkle with coarse salt.

How to bake
With a preheated oven at 250°C / 482 °F. Put the tray with the focaccia in direct contact with the bottom of the oven. Bake for 8 to 10 minutes. This step is important as it will help to evaporate the liquid on the bottom and give a nice crunchy texture.
Transfer the focaccia to the middle rack and bake for another 8-10 minutes.
To check up if it’s cooking properly, lift one corner slightly (with a knife) and see if the bottom is dry and crisp. If it still looks wet, just leave it for another couple of minutes. The top should be of an intense golden color and the bottom should be completely dry.
Take out the ligurian focaccia from the oven and let it rest for 5 minutes right in the tray. Take it off from the tray and place it on a cooling rack. Brush it with a bit of olive oil and let it cool until you can handle it with your hands. Enjoy!
Focaccia With Sourdough Starter
If you’d like to make this focaccia with sourdough you can replace the yeast with 100 gr (about ⅓ cup) of sourdough starter. Also, you can check out our video-guide to make and easy sourdough starter at home.

Ligurian Focaccia | Homemade recipe
Ingredients
For the focaccia
- 500 gr (3 ⅓ cup) bread flour (I used Manitoba)
- 300 ml (1 ¼ cup) water (at room temperature)
- 20 gr (1 Tbsp) extravirgin olive oil (or a good italian olive oil)
- 1 tsp dry yeast
- 1 tsp malt (or honey)
- 10 gr (1 ½ tsp) salt
For the brine
- 180 ml (¾ cup) water (at room temperature)
- 2 Tbsp extravirgin olive oil
- 1 tsp salt
For topping
- extra virgin olive oil
- coarse salt
Instructions
MAKE THE PRE-FERMENTED DOUGH (BIGA)
- Place 150 gr (1 cup) of flour, yeast, malt and 85 ml of water in a medium bowl.
- Knead until the ingredients are combined. Form a ball, make a cross cut on top and let it proof for about 2 hrs or until doubled in size.
MAKE THE DOUGH
- Add the remaining flour into the bowl of a electric mixer. Add the pre-fermented dough and the rest of the water, start kneading at low speed until the ingredients have amalgamated and formed a compact dough.
- While the mixer is still kneading, pour the olive oil slowly and knead until it has been absorbed.
- Add the salt and continue kneading for a minute. At the end you will obtain a soft and elastic dough.
- Form a ball, cover the bowl with a clean damp kitchen towel and leave to proof in a warm place until it has tripled in volume.
- Sprinkle a countertop with flour. Put the dough and slowly roll it into rectangular shape (use also your hands).
- Grease a 14×17″ (35x40cm) baking tray and place the dough on it. With the help of your hands try to shape the dough almost the same size of the tray. Cover with plastic film and leave it to proof for about 50 minutes.
- After the resting time, you will notice that the focaccia has expanded covering almost all tray. If necessary, pull it a little towards the corners so there won’t be any part of the tray uncovered. Cover again and let it proof 30 to 40 minutes.
- Coat your hands with oil and dimple the dough by pressing the pads of your fingers down, little spreading them out when they hit the bottom.
MAKE THE BRINE
- Prepare the brine by mixing all ingredients on a bowl.
- Pour the brine all over the focaccia. Don’t worry if it looks like is a lot of liquid. It will evaporate later during baking.
THE LAST PROOFING
- Leave the focaccia rest for about an hour (while you preheat the oven). This last proofing allow the dough to absorb some of the brine, giving a wonderful taste as a result.
- Once one hour has passed. Add a last drizzle of olive oil over the focaccia and sprinkle with coarse salt.
HOW TO BAKE
- With a preheated oven at 250°C / 482°F. Put the tray with the focaccia in direct contact with the bottom of the oven. Bake for 8 to 10 minutes.
- Transfer the focaccia to the middle rack and bake for another 8-10 minutes.
- To check up if it’s cooking properly, lift one corner slightly (with a knife) and see if the bottom is dry and crisp. If it still looks wet, just leave it for another couple of minutes. The top should be of an intense golden color and the bottom should be completely dry.
- Take out the focaccia from the oven and let it rest for 5 minutes right in the tray. Take it off from the tray and place it on a cooling rack.
- Brush it with a bit of olive oil and let it cool a bit before cutting and eating.
This was SOOOO delicious. The crunchy crust on the bottom and the soft inside was perfect. We have made twice this recipe and both times was incredible tasty. We also added a sprinkle of peperoncino flakes the second time and oh boy!
thanks for the recipe, it didn’t disappointed us!
I must say its a very delicious recipe🤤 and u didn’t wasted time like others in naming the ingredients first🙂